

Difference between revisions of "The Simpsons: Tapped Out Superheroes 2 content update"
(→Item Origins) |
m (→Battles: replaced: ''': → :''') |
||
| (285 intermediate revisions by 8 users not shown) | |||
| Line 1: | Line 1: | ||
| − | {{title | + | {{TOCU title}} |
| − | + | {{TOCUPrevNext|The Simpsons: Tapped Out Homer's Chiliad content update|The Simpsons: Tapped Out 4th of July 2016 content update}} | |
| − | + | [[File:TSTO Superheroes 2016 Icon.png|thumb|100px|right|Event app icon.]][[File:TSTO Superheroes 2016 Splash Screen.png|thumb|300px|right|Event splash screen.]][[File:SH2 Act 1 Event Guide.png|thumb|200px|right|Event Guide.]][[File:SH2 Boss Fight Guide.png|thumb|200px|right|Boss Fight Event Guide.]][[File:SH2 Event Calendar.png|thumb|100px|right|Event Calendar.]][[File:SH2 3 Panel.png|thumb|300px|right|Store Panel.]][[File:SH2 One Panel.png|thumb|100px|right|Store One Panel.]][[File:SFAsylum Gil Deal One Panel.png|thumb|100px|right|Springfield Asylum Gil Deal Panel.]][[File:RMMS One Panel.png|thumb|100px|right|Radioactive Man Movie Scene Gil Deal Panel.]] | |
| − | {{TOCUPrevNext|The Simpsons: Tapped Out Homer's Chiliad content update|The Simpsons: Tapped Out | + | {{quote|The duels are done and even the ghosts have left this ghost town. With everyone settling back to normal, what could be next for Springfield? A suped-up sequel? A new take on an origin story? An ominously foreshadowing political thriller? We're not sure yet because Gary accidentally took his work computer on vacation. Not cool Gary!<br>New characters, new buildings and new stories are coming soon!<br>Stay tuned!|Event teaser on the App Store.}} |
| − | [[File:TSTO Superheroes 2016 Icon.png|thumb|100px|right|Event app icon.]][[File:TSTO Superheroes 2016 Splash Screen.png|thumb|300px|right|Event splash screen.]][[File:SH2 Act 1 Event Guide.png|thumb|200px|right| | + | {{quote|Western duels ended and even ghosts have left town. Life seems to take its course in Springfield. For real ? No ! Because Superhero is back with a scenario to taste away! And political shenanigans to no end. Finally, if Gary does not forget to save the new update. Hey Gary?<br>One thing is certain : new characters, buildings and adventures await you soon!<br>Until then , keep playing!!|French Event teaser on the App Store.}} |
| − | {{quote|The duels are done and even the ghosts have left this ghost town. With everyone settling back to normal, what could be next for Springfield? A suped-up sequel? A new take on an origin story? An ominously foreshadowing political thriller? | + | {{quote|Superheroes never die, they just wait til their reboot. Coming soon to an app store near you: the Superhero sequel you didn't know you wanted but will still wait through the credits to see!|Event teaser on the Facebook page.}} |
| − | {{quote|Western duels ended and even ghosts have left town. Life seems to take its course in Springfield. For real ? No ! Because Superhero is back with a scenario to taste away! And political shenanigans to no end. Finally, if Gary does not forget to save the new update. Hey Gary?<br | + | {{quote|Heroes return to Springfield to fight evil (while gyros return to Springfield to fight a lack of tzatziki sauce). But when a plot is revealed that threatens the entire town, heroes and villains are forced to team up to save it!<br>Join iconic Simpsons characters and their alter-egos as they battle against a greater evil. With new characters, buildings, decorations, and more... including a new battle system. Can you unite villains and heroes to save the town!?|Event Description on the Kindle Pre-release.}} |
| − | {{quote|Superheroes never die, they just wait til their reboot. Coming soon to an app store near you: the Superhero sequel you | + | {{quote|Heroes return to Springfield – no not the sandwiches, the crime fighters – to fight a growing tide of criminals! But when someone's evil plot threatens the entire town, old enemies will need to join together to save Springfield!<br>Join iconic Simpsons characters and their alter-egos as they fight together against a greater evil. With new characters, buildings, decorations, and more... including a new battle system. Can you unite villains and heroes to save the town!?|Event Description on the App Store.}} |
| − | {{quote|Heroes return to Springfield to fight evil (while gyros return to Springfield to fight a lack of tzatziki sauce). But when a plot is revealed that threatens the entire town, heroes and villains are forced to team up to save it!<br | + | '''''[[The Simpsons: Tapped Out]]'' Superheroes 2 content update''' was released on June 14, 2016 and was the one hundred and twentyninth content update. It was teased in the {{TOCU|Wild West}} event Takedown app store update and on the game's Facebook page June 11, 2016. Its Store update was released by mistake on Kindle on June 8. Its the second Superheroes event after {{TOCU|Superheroes|2015's}}. It added 8 new characters, 4 new character skins, 16 new buildings and 36 new decorations. |
| − | {{quote|Heroes return to Springfield – no not the sandwiches, the crime fighters – to fight a growing tide of criminals! But when | ||
| − | '''''[[The Simpsons: Tapped Out]]'' Superheroes 2 content update''' was released on June 14, 2016 and was the one hundred and twentyninth content update. It was teased in the {{TOCU|Wild West}} event Takedown app store update and on the game's Facebook page June | ||
== Characters == | == Characters == | ||
{{Table| | {{Table| | ||
| Line 23: | Line 21: | ||
{{TB|}} | {{TB|}} | ||
{{TBT|[[File:The Scout Master.png|75px]]}} | {{TBT|[[File:The Scout Master.png|75px]]}} | ||
| − | {{TB|[[ | + | {{TB|[[The Scout Master]]}} |
{{TB|{{Donut|100}}}} | {{TB|{{Donut|100}}}} | ||
{{TB|[[File:The Scout Master Unlock.png|300px]]}} | {{TB|[[File:The Scout Master Unlock.png|300px]]}} | ||
| Line 43: | Line 41: | ||
{{TBT|[[File:Old King Coal.png|100px]]}} | {{TBT|[[File:Old King Coal.png|100px]]}} | ||
{{TB|[[Old King Coal]]}} | {{TB|[[Old King Coal]]}} | ||
| − | {{TB| | + | {{TB|{{BrassK|52950}}}} |
{{TB|[[File:Old King Coal Unlock.png|300px]]}} | {{TB|[[File:Old King Coal Unlock.png|300px]]}} | ||
{{TB|Issue 1 prize.}} | {{TB|Issue 1 prize.}} | ||
| Line 53: | Line 51: | ||
{{TBT|[[File:Dr. Crab.png|100px]]}} | {{TBT|[[File:Dr. Crab.png|100px]]}} | ||
{{TB|[[Dr. Crab]]}} | {{TB|[[Dr. Crab]]}} | ||
| − | {{TB| | + | {{TB|{{CrabJ|103600}}}} |
{{TB|[[File:Dr. Crab Unlock.png|300px]]}} | {{TB|[[File:Dr. Crab Unlock.png|300px]]}} | ||
{{TB|Issue 3 prize.}} | {{TB|Issue 3 prize.}} | ||
}} | }} | ||
| − | ===Returning=== | + | === Returning === |
{{Table| | {{Table| | ||
{{TH|Image}} | {{TH|Image}} | ||
| Line 68: | Line 66: | ||
{{TB|}} | {{TB|}} | ||
{{TB|[[File:Fallout Boy Unlock.png|300px]]}} | {{TB|[[File:Fallout Boy Unlock.png|300px]]}} | ||
| − | {{TB|Returns from {{TOCU|Superheroes}}.<br | + | {{TB|Returns from {{TOCU|Superheroes}}.<br>Unlocks with Superior Squad HQ.}} |
{{TBT|[[File:Plopper.png|150px]]}} | {{TBT|[[File:Plopper.png|150px]]}} | ||
{{TB|[[Plopper]]}} | {{TB|[[Plopper]]}} | ||
{{TB|}} | {{TB|}} | ||
{{TB|[[File:Plopper Unlock.png|300px]]}} | {{TB|[[File:Plopper Unlock.png|300px]]}} | ||
| − | {{TB|Returns from {{TOCU|Superheroes}}.<br | + | {{TB|Returns from {{TOCU|Superheroes}}.<br>Unlocks with Crap Silo.}} |
{{TBT|[[File:The Collider.png|100px]]}} | {{TBT|[[File:The Collider.png|100px]]}} | ||
{{TB|[[The Collider]]}} | {{TB|[[The Collider]]}} | ||
| Line 83: | Line 81: | ||
{{TB|}} | {{TB|}} | ||
{{TB|[[File:Dr. Colossus Unlock.png|300px]]}} | {{TB|[[File:Dr. Colossus Unlock.png|300px]]}} | ||
| − | {{TRs|Returns from {{TOCU|Superheroes}}.<br | + | {{TRs|Returns from {{TOCU|Superheroes}}.<br>Unlocks with Death Mountain.}} |
{{TBT|[[File:Petroleus Rex.png|150px]]}} | {{TBT|[[File:Petroleus Rex.png|150px]]}} | ||
{{TB|[[Petroleus Rex]]}} | {{TB|[[Petroleus Rex]]}} | ||
{{TB|}} | {{TB|}} | ||
{{TB|[[File:Petroleus Rex Unlock.png|300px]]}} | {{TB|[[File:Petroleus Rex Unlock.png|300px]]}} | ||
| − | {{TB|Returns from {{TOCU|Superheroes}}.<br | + | {{TB|Returns from {{TOCU|Superheroes}}.<br>Unlock with Tar Pits.}} |
{{TBT|[[File:Radioactive Man.png|100px]]}} | {{TBT|[[File:Radioactive Man.png|100px]]}} | ||
| − | {{TB| | + | {{TB|{{Ch|Radioactive Man}}}} |
{{TB|{{Donut|60}}}} | {{TB|{{Donut|60}}}} | ||
{{TB|[[File:Tapped Out Radioactive Man Unlock.png|300px]]}} | {{TB|[[File:Tapped Out Radioactive Man Unlock.png|300px]]}} | ||
| Line 102: | Line 100: | ||
{{TH|Unlock message}} | {{TH|Unlock message}} | ||
{{TH|Notes|width=30%}} | {{TH|Notes|width=30%}} | ||
| − | {{TBT|[[File:Bouncing Battle Baby.png| | + | {{TBT|[[File:Bouncing Battle Baby.png|125px]]}} |
{{TB|[[Bouncing Battle Baby]]}} | {{TB|[[Bouncing Battle Baby]]}} | ||
| − | {{TB| | + | {{TB|{{CrabJ|45000}}}} |
{{TB|[[File:Bouncing Battle Baby Unlock.png|300px]]}} | {{TB|[[File:Bouncing Battle Baby Unlock.png|300px]]}} | ||
{{TB|Issue 3 prize.}} | {{TB|Issue 3 prize.}} | ||
| − | {{TBT|[[File:Cyborg Snake.png| | + | {{TBT|[[File:Cyborg Snake.png|100px]]}} |
{{TB|[[Holidays of Future Passed|Cyborg Snake]]}} | {{TB|[[Holidays of Future Passed|Cyborg Snake]]}} | ||
| − | {{TB| | + | {{TB|{{BrassK|33400}}}} |
{{TB|[[File:Cyborg Snake Unlock.png|300px]]}} | {{TB|[[File:Cyborg Snake Unlock.png|300px]]}} | ||
{{TB|Issue 1 prize.}} | {{TB|Issue 1 prize.}} | ||
| − | {{TBT|[[File:Clobber Girl.png| | + | {{TBT|[[File:Clobber Girl.png|100px]]}} |
{{TB|[[Clobber Girl]]}} | {{TB|[[Clobber Girl]]}} | ||
| − | {{TB| | + | {{TB|{{SoilantR|12950}}}} |
{{TB|[[File:Clobber Girl Unlock.png|300px]]}} | {{TB|[[File:Clobber Girl Unlock.png|300px]]}} | ||
{{TRs|Issue 2 prize.|2}} | {{TRs|Issue 2 prize.|2}} | ||
| − | {{TBT|[[File: Stretch Dude.png|100px]]}} | + | {{TBT|[[File:Stretch Dude.png|100px]]}} |
| − | {{TB|[[ Stretch Dude]]}} | + | {{TB|[[Stretch Dude]]}} |
| − | {{TB| | + | {{TB|{{SoilantR|64750}}}} |
| − | {{TB|[[File: Stretch Dude Unlock.png|300px]]}} | + | {{TB|[[File:Stretch Dude Unlock.png|300px]]}} |
}} | }} | ||
| − | ===Returning=== | + | === Returning === |
{{Table| | {{Table| | ||
{{TH|Image}} | {{TH|Image}} | ||
| Line 133: | Line 131: | ||
{{TRs|FREE|3}} | {{TRs|FREE|3}} | ||
{{TB|[[File:Clownface Unlock.png|300px]]}} | {{TB|[[File:Clownface Unlock.png|300px]]}} | ||
| − | {{TB|Returns from {{TOCU|Superheroes}}.<br | + | {{TB|Returns from {{TOCU|Superheroes}}.<br>Unlocks after starting Who's the Boss Now? Pt. 1.}} |
{{TBT|[[File:The Collector.png|100px]]}} | {{TBT|[[File:The Collector.png|100px]]}} | ||
{{TB|[[The Collector]]}} | {{TB|[[The Collector]]}} | ||
{{TB|[[File:The Collector Unlock.png|300px]]}} | {{TB|[[File:The Collector Unlock.png|300px]]}} | ||
| − | {{TB|Returns from {{TOCU|Superheroes}}.<br | + | {{TB|Returns from {{TOCU|Superheroes}}.<br>Unlocks after starting Inch by Inch Pt. 1.}} |
{{TBT|[[File:Pie Man.png|100px]]}} | {{TBT|[[File:Pie Man.png|100px]]}} | ||
{{TB|[[Pie Man]]}} | {{TB|[[Pie Man]]}} | ||
{{TB|[[File:Pieman Unlock.png|300px]]}} | {{TB|[[File:Pieman Unlock.png|300px]]}} | ||
| − | {{TB|Returns from {{TOCU|Superheroes}}.<br | + | {{TB|Returns from {{TOCU|Superheroes}}.<br>Unlocks after starting Prelude Pt. 2.}} |
{{TBT|[[File:Bartman.png|100px]]}} | {{TBT|[[File:Bartman.png|100px]]}} | ||
{{TB|[[Bartman]]}} | {{TB|[[Bartman]]}} | ||
| Line 152: | Line 150: | ||
{{TB|[[File:Tapped Out Fruit-Bat-Man New Character.png|300px]]}} | {{TB|[[File:Tapped Out Fruit-Bat-Man New Character.png|300px]]}} | ||
{{TB|Returns from {{TOCU|"Dark Knight Court" episode tie-in}} and {{TOCU|Superheroes}}.}} | {{TB|Returns from {{TOCU|"Dark Knight Court" episode tie-in}} and {{TOCU|Superheroes}}.}} | ||
| + | {{TBT|[[File:Tapped Out Sidekick Milhouse.png|100px]]}} | ||
| + | {{TB|[[Radioactive Man|Sidekick Milhouse]]}} | ||
| + | {{TB|}} | ||
| + | {{TB|[[File:Tapped Out Sidekick Milhouse Unlock.png|300px]]}} | ||
| + | {{TB|Unlocked with Radioactive Man Movie Scene.<br>Returns from {{TOCU|Valentine's Day 2015}} and {{TOCU|Superheroes}}.}} | ||
| + | }} | ||
| + | == Felons (for Social Battles only) == | ||
| + | {{Table| | ||
| + | {{TH|Image}} | ||
| + | {{TH|Name}} | ||
| + | {{TH|Cost}} | ||
| + | {{TH|Notes}} | ||
| + | {{TBT|[[File:Testost-Irene.png|50px]]}} | ||
| + | {{TB|Testost-Irene}} | ||
| + | {{TRs|FREE|2}} | ||
| + | {{TRs|Unlocked after starting Releasing the Pressure.|2}} | ||
| + | {{TBT|[[File:Doctor Doc M.D PhD.png|50px]]}} | ||
| + | {{TB|Doctor Doc M.D PhD}} | ||
| + | {{TBT|[[File:Tungsten Dude.png|50px]]}} | ||
| + | {{TB|Tungsten Dude}} | ||
| + | {{TB|{{SB|3}}}} | ||
| + | {{TRs|Social Battle Prize.|4}} | ||
| + | {{TBT|[[File:STEM-antha.png|50px]]}} | ||
| + | {{TB|STEM-antha}} | ||
| + | {{TB|{{SB|19}}}} | ||
| + | {{TBT|[[File:Gluteus.png|50px]]}} | ||
| + | {{TB|Gluteus}} | ||
| + | {{TB|{{SB|34}}}} | ||
| + | {{TBT|[[File:Meg Ahertz.png|50px]]}} | ||
| + | {{TB|Meg Ahertz}} | ||
| + | {{TB|{{SB|66}}}} | ||
}} | }} | ||
| Line 163: | Line 192: | ||
{{TH|Notes}} | {{TH|Notes}} | ||
{{TBT|[[File:Orphan Alley.png|100px]]}} | {{TBT|[[File:Orphan Alley.png|100px]]}} | ||
| − | {{TB|Orphan Alley}} | + | {{TB|[[Revenge Is a Dish Best Served Three Times|Orphan Alley]]}} |
{{TRs|FREE|4}} | {{TRs|FREE|4}} | ||
{{TRs|6s|4}} | {{TRs|6s|4}} | ||
{{TB|Sheltering Felons}} | {{TB|Sheltering Felons}} | ||
| − | {{TB|Unlocks after starting Orphan Alley Pt. 1.}} | + | {{TB|Unlocks after starting Orphan Alley Pt. 1.<br>Generates 3 Felon groups every 4 hours.}} |
{{TBT|[[File:Soilant Red Factory.png|100px]]}} | {{TBT|[[File:Soilant Red Factory.png|100px]]}} | ||
{{TB|[[Soylent Green|Soilant Red]] Factory}} | {{TB|[[Soylent Green|Soilant Red]] Factory}} | ||
| Line 178: | Line 207: | ||
{{TBT|[[File:Burns' Summer Mansion.png|100px]]}} | {{TBT|[[File:Burns' Summer Mansion.png|100px]]}} | ||
{{TB|[[Springfield Up|Burns' Summer Mansion]]}} | {{TB|[[Springfield Up|Burns' Summer Mansion]]}} | ||
| − | {{TB| | + | {{TB|Rotting Since the 50's}} |
{{TB|Unlocks after starting Inch by Inch Pt. 1.}} | {{TB|Unlocks after starting Inch by Inch Pt. 1.}} | ||
{{TBT|[[File:First Bank of Springfield.png|100px]]}} | {{TBT|[[File:First Bank of Springfield.png|100px]]}} | ||
| Line 187: | Line 216: | ||
{{TB|}} | {{TB|}} | ||
{{TBT|[[File:TSTO Spirography Factory.png|100px]]}} | {{TBT|[[File:TSTO Spirography Factory.png|100px]]}} | ||
| − | {{TB|[[Spirograph | + | {{TB|[[Spirograph Factory]]}} |
| − | {{TB| | + | {{TB|{{CrabJ|61900}}}} |
{{TRs|4h|2}} | {{TRs|4h|2}} | ||
{{TB|Making Lame Math Art Since 1908}} | {{TB|Making Lame Math Art Since 1908}} | ||
| Line 194: | Line 223: | ||
{{TBT|[[File:TSTO Springfield Books.png|100px]]}} | {{TBT|[[File:TSTO Springfield Books.png|100px]]}} | ||
{{TB|[[Springfield Books]]}} | {{TB|[[Springfield Books]]}} | ||
| − | {{TB| | + | {{TB|{{TradingC|2410}}}} |
{{TB|Inviting Forgotten 90's Actors}} | {{TB|Inviting Forgotten 90's Actors}} | ||
{{TB|Issue 1 craftable}} | {{TB|Issue 1 craftable}} | ||
| − | {{TBT|[[File:Wholesome & Sons Publishing.png|100px]]}} | + | {{TBT|[[File:Wholesome & Sons Publishing Tapped Out.png|100px]]}} |
| − | {{TB|Wholesome & Sons Publishing}} | + | {{TB|[[Wholesome & Sons Publishing]]}} |
{{TB|{{Donut|80}}}} | {{TB|{{Donut|80}}}} | ||
{{TB|6s}} | {{TB|6s}} | ||
| Line 205: | Line 234: | ||
{{TBT|[[File:One Week Wonder Films.png|100px]]}} | {{TBT|[[File:One Week Wonder Films.png|100px]]}} | ||
{{TB|[[One-Week Wonder Films|One Week Wonder Films]]}} | {{TB|[[One-Week Wonder Films|One Week Wonder Films]]}} | ||
| − | {{TB| | + | {{TB|{{SB|77}}}} |
{{TB|4h}} | {{TB|4h}} | ||
{{TB|Seeking the Next Big Summer Movie}} | {{TB|Seeking the Next Big Summer Movie}} | ||
| − | {{TB|Social prize.}} | + | {{TB|Social Battle prize.}} |
{{TBT|[[File:TSTO Coolsville.png|100px]]}} | {{TBT|[[File:TSTO Coolsville.png|100px]]}} | ||
{{TB|[[Coolsville Comics & Toys|Coolsville]]}} | {{TB|[[Coolsville Comics & Toys|Coolsville]]}} | ||
| Line 214: | Line 243: | ||
{{TRs|6s|2}} | {{TRs|6s|2}} | ||
{{TB|Providing Respectful Service}} | {{TB|Providing Respectful Service}} | ||
| − | {{TB| | + | {{TB|Unlocks Milo.<br>Generates {{TradingC|20}} every 8 hours.}} |
{{TBT|[[File:Springfield Asylum.png|100px]]}} | {{TBT|[[File:Springfield Asylum.png|100px]]}} | ||
| − | {{TB|[[ | + | {{TB|[[Springfield Home for the Criminally Different|Springfield Asylum]]}} |
{{TB|{{Donut|200}}}} | {{TB|{{Donut|200}}}} | ||
{{TB|Guaranteeing a 150% Escape Rate}} | {{TB|Guaranteeing a 150% Escape Rate}} | ||
| − | {{TB|}} | + | {{TB|Generates 1 Felon group, each member has 5 hearts, every 4 hours.}} |
| − | {{TBT|[[File:Dr. Lenny's Lab.png| | + | {{TBT|[[File:Dr. Lenny's Lab.png|75px]]}} |
{{TB|[[The Abominable Dr. Lenny|Dr. Lenny]]'s Lab}} | {{TB|[[The Abominable Dr. Lenny|Dr. Lenny]]'s Lab}} | ||
| − | {{TB| | + | {{TB|{{CrabJ|78800}}}} |
{{TRs|4h|5}} | {{TRs|4h|5}} | ||
{{TB|Being Good at Torturing Superheroes}} | {{TB|Being Good at Torturing Superheroes}} | ||
| Line 228: | Line 257: | ||
{{TBT|[[File:Mylar Baggings.png|100px]]}} | {{TBT|[[File:Mylar Baggings.png|100px]]}} | ||
{{TB|[[Mylar Baggins Comic Book Shop|Mylar Baggins]]}} | {{TB|[[Mylar Baggins Comic Book Shop|Mylar Baggins]]}} | ||
| − | {{TB| | + | {{TB|{{BrassK|11500}}}} |
{{TB|Gambling it All on the Store Front}} | {{TB|Gambling it All on the Store Front}} | ||
{{TB|Issue 1 prize.}} | {{TB|Issue 1 prize.}} | ||
{{TBT|[[File:Zenith City Condo.png|50px]]}} | {{TBT|[[File:Zenith City Condo.png|50px]]}} | ||
{{TB|[[Zenith City]] Condo}} | {{TB|[[Zenith City]] Condo}} | ||
| − | {{TRs| | + | {{TRs|{{TradingC|960}}|3}} |
{{TRs|Income Tax|3}} | {{TRs|Income Tax|3}} | ||
| − | {{TRs|Packaged together.|3}} | + | {{TRs|Issue 2 craftable.<br>Packaged together.|3}} |
{{TBT|[[File:Zenith City Penthouse.png|50px]]}} | {{TBT|[[File:Zenith City Penthouse.png|50px]]}} | ||
{{TB|[[Zenith City]] Penthouse}} | {{TB|[[Zenith City]] Penthouse}} | ||
| − | |||
{{TBT|[[File:Zenith City Offices.png|100px]]}} | {{TBT|[[File:Zenith City Offices.png|100px]]}} | ||
{{TB|[[Zenith City]] Offices}} | {{TB|[[Zenith City]] Offices}} | ||
| − | {{TB|}} | + | {{TBT|[[File:Radioactive Man Movie Scene.png|100px]]}} |
| + | {{TB|[[Radioactive Man|Radioactive Man Movie Scene]]}} | ||
| + | {{TB|{{Donut|150}}}} | ||
| + | {{TB|6s}} | ||
| + | {{TB|Costing $1 Million per Shot}} | ||
| + | {{TB|Unlocks Sidekick Milhouse.}} | ||
}} | }} | ||
| − | ===Building Upgrades=== | + | === Building Upgrades === |
{{Table| | {{Table| | ||
| − | {{TH|Image|width= | + | {{TH|Image|width=100px}} |
{{TH|Name}} | {{TH|Name}} | ||
{{TH|Costs}} | {{TH|Costs}} | ||
{{TH|Notes}} | {{TH|Notes}} | ||
{{TBT|[[File:Burns' Summer Mansion WW.png|100px]]}} | {{TBT|[[File:Burns' Summer Mansion WW.png|100px]]}} | ||
| − | {{TB| | + | {{TB|Mansion West Wing}} |
| − | {{TRs|FREE| | + | {{TRs|FREE|5}} |
{{TB|Unlocks after completing Inch by Inch Pt. 3.}} | {{TB|Unlocks after completing Inch by Inch Pt. 3.}} | ||
{{TBT|[[File:Burns' Summer Mansion BW.png|100px]]}} | {{TBT|[[File:Burns' Summer Mansion BW.png|100px]]}} | ||
| − | {{TB| | + | {{TB|Mansion Both Wings}} |
{{TB|Unlocks after completing Inch by Inch Pt. 5.}} | {{TB|Unlocks after completing Inch by Inch Pt. 5.}} | ||
| + | {{TBT|[[File:Soilant Red Factory 1.png|100px]]}} | ||
| + | {{TB|Soilant Red Factory Destroyed - 1}} | ||
| + | {{TB|Unlocks after completing Claws Combat Pt. 1.}} | ||
| + | {{TBT|[[File:Soilant Red Factory 2.png|100px]]}} | ||
| + | {{TB|Soilant Red Factory Destroyed - 2}} | ||
| + | {{TB|Unlocks after completing Claws Combat Pt. 2.}} | ||
| + | {{TBT|[[File:Soilant Red Factory 3.png|100px]]}} | ||
| + | {{TB|Soilant Red Factory Destroyed - 3}} | ||
| + | {{TB|Unlocks after completing Claws Combat Pt. 3.}} | ||
| + | {{TBT|[[File:Soilant Red Factory 4.png|100px]]}} | ||
| + | {{TB|Soilant Red Factory Destroyed - 4}} | ||
| + | {{TRs|FREE|5}} | ||
| + | {{TB|Unlocks after completing Claws Combat Pt. 4.}} | ||
| + | {{TBT|[[File:Soilant Red Factory 5.png|100px]]}} | ||
| + | {{TB|Soilant Red Factory Destroyed - 5}} | ||
| + | {{TB|Unlocks after completing Claws Combat Pt. 5.}} | ||
| + | {{TBT|[[File:Soilant Red Factory 6.png|100px]]}} | ||
| + | {{TB|Soilant Red Factory Destroyed - 6}} | ||
| + | {{TB|Unlocks after attacking Mr. Pinchy.}} | ||
| + | {{TBT|[[File:Soilant Red Factory 7.png|100px]]}} | ||
| + | {{TB|Soilant Red Factory Destroyed - 7}} | ||
| + | {{TB|Unlocks after stunning Mr. Pinchy.}} | ||
| + | {{TBT|[[File:Soilant Red Factory 8.png|100px]]}} | ||
| + | {{TB|Soilant Red Factory Destroyed - 8}} | ||
| + | {{TB|Unlocks after completing Claws Combat Pt. 6.}} | ||
}} | }} | ||
| − | ===Returning=== | + | |
| + | === Returning === | ||
{{Table| | {{Table| | ||
{{TH|Image|width=150px}} | {{TH|Image|width=150px}} | ||
| Line 270: | Line 329: | ||
{{TB|4h}} | {{TB|4h}} | ||
{{TB|Fighting Crime}} | {{TB|Fighting Crime}} | ||
| − | {{TB|Returns from {{TOCU|Superheroes}}.<br | + | {{TB|Returns from {{TOCU|Superheroes}}.<br>Unlocks Fallout Boy.<br>Unlocks after starting Prelude Pt. 2.}} |
{{TBT|[[File:Tapped Out Crap Silo.png|100px]]}} | {{TBT|[[File:Tapped Out Crap Silo.png|100px]]}} | ||
| − | {{TB|[[ | + | {{TB|[[The Simpsons Movie|Crap Silo]]}} |
{{TB|{{Donut|100}}}} | {{TB|{{Donut|100}}}} | ||
| − | {{TRs|6s| | + | {{TRs|6s|9}} |
{{TB|Producing Methane}} | {{TB|Producing Methane}} | ||
| − | {{TB|Returns from {{TOCU|Superheroes}}.<br | + | {{TB|Returns from {{TOCU|Superheroes}}.<br>Unlocks Plopper.}} |
{{TBT|[[File:Tapped Out Tar Pits.png|100px]]}} | {{TBT|[[File:Tapped Out Tar Pits.png|100px]]}} | ||
{{TB|[[Springfield Tar Pits|Tar Pits]]}} | {{TB|[[Springfield Tar Pits|Tar Pits]]}} | ||
{{TB|{{Donut|175}}}} | {{TB|{{Donut|175}}}} | ||
{{TB|Preserving Dinosaur DNA}} | {{TB|Preserving Dinosaur DNA}} | ||
| − | {{TB|Returns from {{TOCU|Superheroes}}.<br | + | {{TB|Returns from {{TOCU|Superheroes}}.<br>Unlocks Petroleus Rex.}} |
{{TBT|[[File:Tapped Out Kane Manor.png|100px]]}} | {{TBT|[[File:Tapped Out Kane Manor.png|100px]]}} | ||
| − | {{TB|[[ | + | {{TB|[[Claude Kane III|Kane]] Manor}} |
{{TRs|{{Donut|55}}|2}} | {{TRs|{{Donut|55}}|2}} | ||
{{TB|Fumigating Bat Infestation}} | {{TB|Fumigating Bat Infestation}} | ||
| − | {{TRs|Returns from {{TOCU|Superheroes}}.| | + | {{TRs|Returns from {{TOCU|Superheroes}}.|4}} |
{{TBT|[[File:Tapped Out Bartman Cave.png|100px]]}} | {{TBT|[[File:Tapped Out Bartman Cave.png|100px]]}} | ||
{{TB|[[Bartman Cave]]}} | {{TB|[[Bartman Cave]]}} | ||
{{TB|Failing to be a Secret Lair}} | {{TB|Failing to be a Secret Lair}} | ||
{{TBT|[[File:Tapped Out Montgomery Burns State Prison.png|100px]]}} | {{TBT|[[File:Tapped Out Montgomery Burns State Prison.png|100px]]}} | ||
| − | {{TB|[[ | + | {{TB|[[The Seven-Beer Snitch|Burns State Prison]]}} |
{{TB|{{Donut|90}}}} | {{TB|{{Donut|90}}}} | ||
{{TB|Enforcing Mandatory Minimum Sentences}} | {{TB|Enforcing Mandatory Minimum Sentences}} | ||
| Line 298: | Line 357: | ||
{{TB|{{Donut|80}}}} | {{TB|{{Donut|80}}}} | ||
{{TB|Charging Banking Fees}} | {{TB|Charging Banking Fees}} | ||
| − | {{ | + | {{TRsT|[[File:Tapped Out Death Mountain.png|100px]]|2}} |
| − | {{ | + | {{TRs|[[Death Mountain]]|2}} |
| − | {{TB|{{Donut| | + | {{TB|{{Donut|60}}}} |
| − | {{ | + | {{TRs|Hatching Implausible Schemes|2}} |
| + | {{TB|Returns from {{TOCU|Superheroes}}.}} | ||
| + | {{TBT|{{Donut|120}}}} | ||
| + | {{TB|Unlocks Dr. Colossus.<br>Returns from {{TOCU|Superheroes}}.}} | ||
{{TBT|[[File:Tapped Out Beachhouse.png|100px]]}} | {{TBT|[[File:Tapped Out Beachhouse.png|100px]]}} | ||
{{TB|Beach House}} | {{TB|Beach House}} | ||
{{TB|{{Donut|120}}}} | {{TB|{{Donut|120}}}} | ||
{{TB|Ignoring The Threat Of Coastal Erosion}} | {{TB|Ignoring The Threat Of Coastal Erosion}} | ||
| + | {{TB|Returns from {{TOCU|Superheroes}}.}} | ||
{{TBT|[[File:Tapped Out Zenith City Times.png|50px]]}} | {{TBT|[[File:Tapped Out Zenith City Times.png|50px]]}} | ||
{{TB|[[Zenith City Times]]}} | {{TB|[[Zenith City Times]]}} | ||
| − | {{ | + | {{TB|{{TradingC|960}}}} |
{{TRs|4h|5}} | {{TRs|4h|5}} | ||
{{TB|Being A Dying Medium}} | {{TB|Being A Dying Medium}} | ||
| − | {{TB|Returns from {{TOCU|Superheroes}}.<br | + | {{TB|Returns from {{TOCU|Superheroes}}.<br>Issue 2 Craftable.}} |
{{TBT|[[File:Tapped Out Zenith City Store Front.png|100px]]}} | {{TBT|[[File:Tapped Out Zenith City Store Front.png|100px]]}} | ||
{{TB|[[Zenith City]] Store Front}} | {{TB|[[Zenith City]] Store Front}} | ||
| + | {{TRs|{{TradingC|945}}|3}} | ||
{{TRs|Income Tax|3}} | {{TRs|Income Tax|3}} | ||
| − | {{TRs|Returns from {{TOCU|Superheroes}}.<br | + | {{TRs|Returns from {{TOCU|Superheroes}}.<br>Issue 3 Craftable.<br>Packaged together.|3}} |
{{TBT|[[File:Tapped Out Zenith City Apartments.png|100px]]}} | {{TBT|[[File:Tapped Out Zenith City Apartments.png|100px]]}} | ||
{{TB|[[Zenith City]] Apartments}} | {{TB|[[Zenith City]] Apartments}} | ||
| Line 322: | Line 386: | ||
{{TBT|[[File:Tapped Out Botanical Garden.png|100px]]}} | {{TBT|[[File:Tapped Out Botanical Garden.png|100px]]}} | ||
{{TB|[[Springfield Botanical Gardens|Botanical Garden]]}} | {{TB|[[Springfield Botanical Gardens|Botanical Garden]]}} | ||
| − | {{TB| | + | {{TB|{{TradingC|945}}}} |
{{TB|Boring School Children}} | {{TB|Boring School Children}} | ||
| − | {{TB|Returns from {{TOCU|Superheroes}}.<br | + | {{TB|Returns from {{TOCU|Superheroes}}.<br>Issue 3 Craftable.}} |
}} | }} | ||
| − | ==Combos== | + | == Combos == |
{{Table| | {{Table| | ||
{{TH|Image|width=150px}} | {{TH|Image|width=150px}} | ||
| Line 363: | Line 427: | ||
{{TBT|[[File:Tapped Out Alien.png|100px]]}} | {{TBT|[[File:Tapped Out Alien.png|100px]]}} | ||
{{TB|[[Radioactive Man|Alien]]}} | {{TB|[[Radioactive Man|Alien]]}} | ||
| − | {{TB| | + | {{TB|{{BrassK|19000}}}} |
{{TB|Issue 1 prize.}} | {{TB|Issue 1 prize.}} | ||
{{TBT|[[File:Tapped Out Attack Helicopter.png|100px]]}} | {{TBT|[[File:Tapped Out Attack Helicopter.png|100px]]}} | ||
{{TB|[[Homer the Whopper|Attack Helicopter]]}} | {{TB|[[Homer the Whopper|Attack Helicopter]]}} | ||
| − | {{TB| | + | {{TB|{{SoilantR|22300}}}} |
{{TB|Issue 2 prize.}} | {{TB|Issue 2 prize.}} | ||
{{TBT|[[File:Tapped Out Atomic Bomb.png|75px]]}} | {{TBT|[[File:Tapped Out Atomic Bomb.png|75px]]}} | ||
{{TB|[[Sideshow Bob's Last Gleaming|Atomic Bomb]]}} | {{TB|[[Sideshow Bob's Last Gleaming|Atomic Bomb]]}} | ||
| − | {{TRs| | + | {{TRs|{{TradingC|170}}|6}} |
{{TRs|Issue 3 craftable.|3}} | {{TRs|Issue 3 craftable.|3}} | ||
{{TBT|[[File:Tapped Out Bent Over Lamppost.png|50px]]}} | {{TBT|[[File:Tapped Out Bent Over Lamppost.png|50px]]}} | ||
| Line 379: | Line 443: | ||
{{TBT|[[File:Tapped Out Garbage Can.png|50px]]}} | {{TBT|[[File:Tapped Out Garbage Can.png|50px]]}} | ||
{{TB|Garbage Can}} | {{TB|Garbage Can}} | ||
| − | {{TRs|Issue 3 craftable.<br | + | {{TRs|Issue 3 craftable.<br>Packaged together.|3}} |
{{TBT|[[File:Tapped Out Green Bin.png|50px]]}} | {{TBT|[[File:Tapped Out Green Bin.png|50px]]}} | ||
{{TB|Green Bin}} | {{TB|Green Bin}} | ||
| Line 386: | Line 450: | ||
{{TBT|[[File:Tapped Out The Collector Lucite Statue.png|75px]]}} | {{TBT|[[File:Tapped Out The Collector Lucite Statue.png|75px]]}} | ||
{{TB|[[The Collector]] Lucite Statue}} | {{TB|[[The Collector]] Lucite Statue}} | ||
| − | {{TB| | + | {{TB|{{TradingC|785}}}} |
{{TB|Issue 1 craftable.}} | {{TB|Issue 1 craftable.}} | ||
{{TBT|[[File:Tapped Out Basketball Court.png|100px]]}} | {{TBT|[[File:Tapped Out Basketball Court.png|100px]]}} | ||
| Line 394: | Line 458: | ||
{{TBT|[[File:Tapped Out Hero Clothesline.png|50px]]}} | {{TBT|[[File:Tapped Out Hero Clothesline.png|50px]]}} | ||
{{TB|Hero Clothesline}} | {{TB|Hero Clothesline}} | ||
| − | {{TB| | + | {{TB|{{TradingC|210}}}} |
{{TRs|Issue 3 craftable|2}} | {{TRs|Issue 3 craftable|2}} | ||
{{TBT|[[File:Tapped Out High Voltage Transformer.png|50px]]}} | {{TBT|[[File:Tapped Out High Voltage Transformer.png|50px]]}} | ||
{{TB|[[Revenge Is a Dish Best Served Three Times|High Voltage Transformer]]}} | {{TB|[[Revenge Is a Dish Best Served Three Times|High Voltage Transformer]]}} | ||
| − | {{TB| | + | {{TB|{{TradingC|335}}}} |
{{TBT|[[File:Tapped Out Kiosk.png|50px]]}} | {{TBT|[[File:Tapped Out Kiosk.png|50px]]}} | ||
{{TB|[[Revenge Is a Dish Best Served Three Times|Kiosk]]}} | {{TB|[[Revenge Is a Dish Best Served Three Times|Kiosk]]}} | ||
| − | {{TB| | + | {{TB|{{SB|12}}}} |
| − | {{TB|Social prize.}} | + | {{TB|Social Battle prize.}} |
{{TBT|[[File:Tapped Out Lobster Island.png|100px]]}} | {{TBT|[[File:Tapped Out Lobster Island.png|100px]]}} | ||
| − | {{TB|Lobster Island}} | + | {{TB|{{W|Prince Edward Island|Lobster Island}}}} |
{{TB|{{Donut|70}}}} | {{TB|{{Donut|70}}}} | ||
{{TB|}} | {{TB|}} | ||
{{TBT|[[File:Tapped Out Lucite Container.png|100px]]}} | {{TBT|[[File:Tapped Out Lucite Container.png|100px]]}} | ||
{{TB|[[Treehouse of Horror X|Lucite Container]]}} | {{TB|[[Treehouse of Horror X|Lucite Container]]}} | ||
| − | {{TB| | + | {{TB|{{TradingC|325}}}} |
{{TB|Issue 1 craftable.}} | {{TB|Issue 1 craftable.}} | ||
{{TBT|[[File:Tapped Out Milhouse's Trailer.png|100px]]}} | {{TBT|[[File:Tapped Out Milhouse's Trailer.png|100px]]}} | ||
| Line 417: | Line 481: | ||
{{TBT|[[File:Tapped Out Painted Horse.png|50px]]}} | {{TBT|[[File:Tapped Out Painted Horse.png|50px]]}} | ||
{{TB|[[Radioactive Man|Painted Horse]]}} | {{TB|[[Radioactive Man|Painted Horse]]}} | ||
| − | {{TB| | + | {{TB|{{TradingC|790}}}} |
{{TB|Issue 3 craftable.}} | {{TB|Issue 3 craftable.}} | ||
{{TBT|[[File:Tapped Out Plastic Prison.png|100px]]}} | {{TBT|[[File:Tapped Out Plastic Prison.png|100px]]}} | ||
{{TB|[[Bart's New Friend|Plastic Prison]]}} | {{TB|[[Bart's New Friend|Plastic Prison]]}} | ||
| − | {{TB| | + | {{TB|{{SoilantR|50350}}}} |
{{TB|Issue 2 prize.}} | {{TB|Issue 2 prize.}} | ||
{{TBT|[[File:Tapped Out Zenith City Billboard.png|75px]]}} | {{TBT|[[File:Tapped Out Zenith City Billboard.png|75px]]}} | ||
{{TB|[[Zenith City]] Billboard}} | {{TB|[[Zenith City]] Billboard}} | ||
| − | {{TB| | + | {{TB|{{TradingC|335}}}} |
{{TB|Issue 2 craftable.}} | {{TB|Issue 2 craftable.}} | ||
{{TBT|[[File:Tapped Out X-Ray Machine.png|100px]]}} | {{TBT|[[File:Tapped Out X-Ray Machine.png|100px]]}} | ||
{{TB|[[Treehouse of Horror X|X-Ray Machine]]}} | {{TB|[[Treehouse of Horror X|X-Ray Machine]]}} | ||
| − | {{TB| | + | {{TB|{{SoilantR|41000}}}} |
{{TB|Issue 2 prize.}} | {{TB|Issue 2 prize.}} | ||
{{TBT|[[File:Tapped Out X-Ray Truck.png|100px]]}} | {{TBT|[[File:Tapped Out X-Ray Truck.png|100px]]}} | ||
{{TB|[[Radioactive Man|X-Ray Truck]]}} | {{TB|[[Radioactive Man|X-Ray Truck]]}} | ||
| − | {{TB| | + | {{TB|{{CrabJ|16850}}}} |
{{TB|Issue 3 prize.}} | {{TB|Issue 3 prize.}} | ||
{{TBT|[[File:Tapped Out Satellite Station.png|75px]]}} | {{TBT|[[File:Tapped Out Satellite Station.png|75px]]}} | ||
| − | {{TB|Satellite Station}} | + | {{TB|[[Dark Knight Court|Satellite Station]]}} |
{{TB|{{Donut|160}}}} | {{TB|{{Donut|160}}}} | ||
| − | {{TB|Task: Harvesting Free Ions<br/ | + | {{TB|Task: Harvesting Free Ions<br>Generates 170 (Issue 1)/200 (Issue 2)/290 (Issue 3) Event Currency every 4h.}} |
{{TBT|[[File:Tapped Out Giant Snake in a Tree.png|50px]]}} | {{TBT|[[File:Tapped Out Giant Snake in a Tree.png|50px]]}} | ||
{{TB|[[Revenge Is a Dish Best Served Three Times|Giant Snake in a Tree]]}} | {{TB|[[Revenge Is a Dish Best Served Three Times|Giant Snake in a Tree]]}} | ||
| − | {{TB| | + | {{TB|{{TradingC|835}}}} |
{{TB|Issue 2 craftable.}} | {{TB|Issue 2 craftable.}} | ||
{{TBT|[[File:Tapped Out Pie Man Epic Statue.png|50px]]}} | {{TBT|[[File:Tapped Out Pie Man Epic Statue.png|50px]]}} | ||
| − | {{TB|[[Pie Man]] | + | {{TB|[[Simple Simpson|Pie Man Epic Statue]]}} |
| − | {{TB| | + | {{TB|{{SB|44}}}} |
| − | {{TB|Social prize.}} | + | {{TB|Social Battle prize.}} |
{{TBT|[[File:Tapped Out The Collector's Car.png|100px]]}} | {{TBT|[[File:Tapped Out The Collector's Car.png|100px]]}} | ||
{{TB|[[The Collector]]'s Car}} | {{TB|[[The Collector]]'s Car}} | ||
| − | {{TB| | + | {{TB|{{TradingC|965}}}} |
{{TB|Issue 1 craftable.}} | {{TB|Issue 1 craftable.}} | ||
| − | {{TBT|[[File:Tapped Out Aqua World Main Guard Tower.png| | + | {{TBT|[[File:Tapped Out Aqua World Main Guard Tower.png|75px]]}} |
{{TB|[[Radioactive Man|Aqua World Main Guard Tower]]}} | {{TB|[[Radioactive Man|Aqua World Main Guard Tower]]}} | ||
| − | {{TB| | + | {{TB|{{BrassK|41450}}}} |
{{TB|Issue 1 prize.}} | {{TB|Issue 1 prize.}} | ||
{{TBT|[[File:Tapped Out Aqua World Wharf.png|50px]]}} | {{TBT|[[File:Tapped Out Aqua World Wharf.png|50px]]}} | ||
{{TB|[[Radioactive Man|Aqua World Wharf]]}} | {{TB|[[Radioactive Man|Aqua World Wharf]]}} | ||
| − | {{TB| | + | {{TB|{{TradingC|2415}}}} |
| − | {{TB|Issue 2 craftable.}} | + | {{TB|Issue 2 craftable.<br>Wrongly shown in the crafting menu as the same as the premium Aqua World Fishing Platform.}} |
}} | }} | ||
| − | ===Returning=== | + | === Returning === |
{{Table| | {{Table| | ||
{{TH|Image|width=150px}} | {{TH|Image|width=150px}} | ||
| Line 480: | Line 544: | ||
{{TB|Radstation Air Fortress}} | {{TB|Radstation Air Fortress}} | ||
{{TB|{{Donut|225}}}} | {{TB|{{Donut|225}}}} | ||
| − | {{TB|Task: Making Newton Roll in his Grave<br | + | {{TB|Task: Making Newton Roll in his Grave<br>Returns from {{TOCU|Superheroes}}.}} |
{{TBT|[[File:Tapped Out Super Jeb.png|50px]]}} | {{TBT|[[File:Tapped Out Super Jeb.png|50px]]}} | ||
{{TB|Super [[Jebediah Springfield|Jeb]]}} | {{TB|Super [[Jebediah Springfield|Jeb]]}} | ||
| Line 487: | Line 551: | ||
{{TBT|[[File:France Flag.png|25px]]}} | {{TBT|[[File:France Flag.png|25px]]}} | ||
{{TB|[[France]] Flag}} | {{TB|[[France]] Flag}} | ||
| − | {{TB| | + | {{TB|{{TradingC|4000}}}} |
| − | {{TB|Returns from {{TOCU|Tap Ball and Soccer Cup 2015}}.<br | + | {{TB|Returns from {{TOCU|Tap Ball and Soccer Cup 2015}}.<br>Unlocks Charcoal Briquette.<br>Bastille Day craftable.}} |
| − | |||
| − | |||
| − | |||
| − | |||
| − | |||
| − | |||
| − | |||
| − | |||
| − | |||
| − | |||
}} | }} | ||
| Line 507: | Line 561: | ||
{{TH|Costs}} | {{TH|Costs}} | ||
{{TH|Notes}} | {{TH|Notes}} | ||
| − | {{ | + | {{TRsT|[[File:Sequel Squad Membership.png|75px]]|2}} |
| − | {{ | + | {{TRs|[[Superior Squad|Sequel Squad]] Membership|2}} |
{{TB|{{Donut|90}}}} | {{TB|{{Donut|90}}}} | ||
| − | {{TB|}} | + | {{TB|Before July 18th Update}} |
| − | {{TRsT|[[File:Small Band-Aid Box.png| | + | {{TBT|{{Donut|30}}}} |
| − | {{TRs|Small Band-Aid Box: | + | {{TB|After July 18th Update}} |
| − | {{TB| | + | {{TRsT|[[File:Small Band-Aid Box.png|75px]]|2}} |
| + | {{TRs|[[I, (Annoyed Grunt)-bot|Small Band-Aid Box]]: {{BandA|5}}|2}} | ||
| + | {{TB|{{TradingC|100}}}} | ||
{{TB|Issue 1-2 craftable}} | {{TB|Issue 1-2 craftable}} | ||
| − | {{TBT| | + | {{TBT|{{TradingC|105}}}} |
{{TB|Issue 3 craftable}} | {{TB|Issue 3 craftable}} | ||
| − | {{TBT|[[File:Large Band-Aid Box.png| | + | {{TBT|[[File:Large Band-Aid Box.png|75px]]}} |
| − | {{TB|Large Band-Aid Box: | + | {{TB|[[I, (Annoyed Grunt)-bot|Large Band-Aid Box]]: {{BandA|10}}}} |
| − | {{TB| | + | {{TB|{{TradingC|180}}}} |
{{TB|Craftable}} | {{TB|Craftable}} | ||
| − | {{TBT|[[File:First Aid Kit.png| | + | {{TBT|[[File:First Aid Kit.png|75px]]}} |
| − | {{TB|First Aid Kit: | + | {{TB|[[I, (Annoyed Grunt)-bot|First Aid Kit]]: {{BandA|20}}}} |
| − | {{TB| | + | {{TB|{{TradingC|340}}}} |
{{TB|Craftable}} | {{TB|Craftable}} | ||
| − | {{TBT|[[File:Sciencewater Bottle.png| | + | {{TBT|[[File:Sciencewater Bottle.png|50px]]}} |
{{TB|[[Sciencewater]]}} | {{TB|[[Sciencewater]]}} | ||
{{TB|{{Donut|2}}}} | {{TB|{{Donut|2}}}} | ||
| Line 531: | Line 587: | ||
}} | }} | ||
| − | ==Item | + | == Item origins == |
{{Table| | {{Table| | ||
{{TH|Item or Building|width=300px}} | {{TH|Item or Building|width=300px}} | ||
{{TH|Episode}} | {{TH|Episode}} | ||
| − | {{TBT|The Fracker, Citizen Solar}} | + | {{TBT|The Fracker, Citizen Solar,<br>Charcoal Briquette, Old King Coal}} |
| − | {{TB|[[Married to the Blob]], [[Opposites A-Frack]] (action figure), | + | {{TB|"[[Married to the Blob]]", "[[Opposites A-Frack]]" (action figure), "[[The Dad-Feelings Limited]]" (action figure)}} |
| − | {{TBT|The Scout Master, | + | {{TBT|The Scout Master, Sidekick Milhouse,<br>Spirography Factory, Aqua World Fuel Tank,<br>Aqua World Prison Tower,<br>Aqua World Fishing Platform, Alien,<br>Milhouse's Trailer, Painted Horse,<br>X-Ray Truck, Aqua World Main Guard Tower,<br>Aqua World Wharf, Radioactive Man Movie Scene}} |
| − | {{TB|[[Radioactive Man]]}} | + | {{TB|"[[Radioactive Man]]"}} |
{{TBT|Wind Lad}} | {{TBT|Wind Lad}} | ||
| − | {{TB|[[Married to the Blob]], [[Opposites A-Frack]] (action figure), [[I Won't Be Home | + | {{TB|"[[Married to the Blob]]", "[[Opposites A-Frack]]" (action figure), "[[I Won't Be Home for Christmas]]" (action figure), "[[The Dad-Feelings Limited]]" (action figure)}} |
{{TBT|Milo}} | {{TBT|Milo}} | ||
| − | {{TB|[[Husbands and Knives]], [[The Day the Earth Stood Cool]], [[Married to the Blob]], [[The Yellow Badge of Cowardge]] (couch gag), [[Every Man's Dream]]}} | + | {{TB|"[[Husbands and Knives]]", "[[The Day the Earth Stood Cool]]", "[[Married to the Blob]]", "[[The Yellow Badge of Cowardge]]" (couch gag), "[[Every Man's Dream]]", "[[Gal of Constant Sorrow]]"}} |
{{TBT|Dr. Crab}} | {{TBT|Dr. Crab}} | ||
| − | {{TB|Comics, [[Old Money]] | + | {{TB|[[List of Comics|Comics]], "[[Old Money]]", "[[Three Men and a Comic Book]]", "[[Married to the Blob]]", "[[Blazed and Confused]]"}} |
{{TBT|Cyber Snake}} | {{TBT|Cyber Snake}} | ||
| − | {{TB|[[Holidays of Future Passed]]}} | + | {{TB|"[[Holidays of Future Passed]]"}} |
{{TBT|Clobber Girl}} | {{TBT|Clobber Girl}} | ||
| − | {{TB|[[Treehouse of Horror X|Treehouse of Horror X - "Desperately Xeeking Xena"]], [[My Fare Lady]] (opening sequence)}} | + | {{TB|[[Treehouse of Horror X|Treehouse of Horror X - "Desperately Xeeking Xena"]], "[[My Fare Lady]]" (opening sequence), "[[Trust but Clarify]]" (opening sequence)}} |
| − | {{TBT|Stretch Dude, Springfield Books, The Collector, The Collector Lucite Statue, Lucite Container, X-Ray Machine, The Collector's Car}} | + | {{TBT|Stretch Dude}} |
| + | {{TB|[[Treehouse of Horror X|Treehouse of Horror X - "Desperately Xeeking Xena"]], "[[Trust but Clarify]]" (opening sequence)}} | ||
| + | {{TBT|Springfield Books, The Collector,<br>The Collector Lucite Statue, Lucite Container,<br>X-Ray Machine, The Collector's Car}} | ||
{{TB|[[Treehouse of Horror X|Treehouse of Horror X - "Desperately Xeeking Xena"]]}} | {{TB|[[Treehouse of Horror X|Treehouse of Horror X - "Desperately Xeeking Xena"]]}} | ||
{{TBT|Fallout Boy}} | {{TBT|Fallout Boy}} | ||
| − | {{TB|[[Three Men and a Comic Book]], [[Radioactive Man]], [[Married to the Blob]] (mentioned), [[Opposites A-Frack]] (action figure)}} | + | {{TB|"[[Three Men and a Comic Book]]", "[[Radioactive Man]]", "[[My Big Fat Geek Wedding]]" (Milhouse as Fallout Boy), "[[Homer the Whopper]]" (comic), "[[Moms I'd Like to Forget]]" (comic),<br>"[[Four Regrettings and a Funeral]]" (title screen gag), "[[Married to the Blob]]" (Milhouse as Fallout Boy, mentioned, comic), "[[Opposites A-Frack]]" (action figure)}} |
{{TBT|Dr. Colossus}} | {{TBT|Dr. Colossus}} | ||
| − | {{TB|[[Lisa vs. Malibu Stacy]], [[Who Shot Mr. Burns? (Part Two)]], [[22 Short Films About Springfield]], [[Behind the Laughter]] (character image), [[The Simpsons Guy]]}} | + | {{TB|"[[Lisa vs. Malibu Stacy]]", "[[Who Shot Mr. Burns? (Part Two)]]", "[[22 Short Films About Springfield]]", "[[Behind the Laughter]]" (character image), "[[The Simpsons Guy]]"}} |
| − | {{TBT|Radioactive Man | + | {{TBT|Radioactive Man, Plopper, France Flag,<br>Garbage Can, Trading Card}} |
| − | + | {{TB|Recurring}} | |
| − | |||
| − | {{TB| | ||
{{TBT|The Collider}} | {{TBT|The Collider}} | ||
| − | {{TB|[[Steal This Episode]], [[Opposites A-Frack]] (action figure)}} | + | {{TB|"[[Steal This Episode]]", "[[Opposites A-Frack]]" (action figure), "[[The Dad-Feelings Limited]]" (action figure)}} |
{{TBT|Petroleus Rex}} | {{TBT|Petroleus Rex}} | ||
| − | {{TB|[[Married to the Blob]]}} | + | {{TB|"[[Married to the Blob]]"}} |
{{TBT|Pie Man}} | {{TBT|Pie Man}} | ||
| − | {{TB|[[Simple Simpson]], [[The Blue and the Gray]] (title screen), [[Four Regrettings and a Funeral]] ([[Chip Davis]] tribute credits)}} | + | {{TB|"[[Simple Simpson]]", "[[The Blue and the Gray]]" (title screen), "[[Four Regrettings and a Funeral]]" ([[Chip Davis]] tribute credits)}} |
{{TBT|Clownface}} | {{TBT|Clownface}} | ||
| − | {{TB|[[Large Marge]]}} | + | {{TB|"[[Large Marge]]"}} |
{{TBT|Bartman}} | {{TBT|Bartman}} | ||
| − | {{TB|[[Three Men and a Comic Book]], [[Revenge | + | {{TB|"[[Three Men and a Comic Book]]", "[[They Saved Lisa's Brain]]", "[[Revenge Is a Dish Best Served Three Times]]", "[[Gorgeous Grampa]]" ([[Homer Shake]])}} |
{{TBT|Fruit-Bat-Man}} | {{TBT|Fruit-Bat-Man}} | ||
| − | {{TB|[[Dark Knight Court]], [[Super Franchise Me]] (title screen gag), [[Waiting for Duffman]]}} | + | {{TB|"[[Dark Knight Court]]", "[[Super Franchise Me]]" (title screen gag), "[[Waiting for Duffman]]"}} |
| − | {{TBT|Soilant Red Factory<br | + | {{TBT|Soilant Red Factory, Soilant Red Juice<br>(as [[Soylent Green]])}} |
| − | {{TB|[[Itchy & Scratchy: The Movie]] (mentioned), [[Bart to the Future]], [[Million-Dollar Abie]], [[Holidays of Future Passed]] (seen on a poster)}} | + | {{TB|"[[Itchy & Scratchy: The Movie]]" (mentioned), [[Treehouse of Horror V|Treehouse of Horror V - "Nightmare Cafeteria"]] (inspired by it), "[[The Old Man and the Lisa]]" (parody),<br>"[[Bart to the Future]]", "[[Million-Dollar Abie]]", "[[Holidays of Future Passed]]" (seen on a poster)}} |
{{TBT|Dead Lobster}} | {{TBT|Dead Lobster}} | ||
| − | {{TB|[[E Pluribus Wiggum]]}} | + | {{TB|"[[E Pluribus Wiggum]]"}} |
{{TBT|Burns' Summer Mansion}} | {{TBT|Burns' Summer Mansion}} | ||
| − | {{TB|[[Springfield Up]]}} | + | {{TB|"[[Springfield Up]]", [[The Great Phatsby]]}} |
{{TBT|First Bank of Springfield}} | {{TBT|First Bank of Springfield}} | ||
| − | {{TB|[[Homer vs. Patty and Selma]], [[The PTA Disbands]], [[Bart the Fink]], [[Missionary: Impossible]], [[HOMЯ]], [[I Don't Wanna Know Why the Caged Bird Sings]], [[Chief of Hearts]], [[500 Keys]]}} | + | {{TB|"[[Homer vs. Patty and Selma]]", "[[The PTA Disbands]]", "[[Bart the Fink]]", "[[Missionary: Impossible]]",<br>"[[Realty Bites]]" (check), "[[HOMЯ]]", "[[I Don't Wanna Know Why the Caged Bird Sings]]", "[[Chief of Hearts]]", "[[500 Keys]]"}} |
| − | {{TBT|One Week Wonder Films, Mylar Baggins | + | {{TBT|One Week Wonder Films, Attack Helicopter}} |
| − | {{TB|[[Homer the Whopper]]}} | + | {{TB|"[[Homer the Whopper]]"}} |
| + | {{TBT|Mylar Baggins}} | ||
| + | {{TB|"[[Little Big Girl]]", "[[Homer the Whopper]]"}} | ||
{{TBT|Coolsville}} | {{TBT|Coolsville}} | ||
| − | {{TB|[[Husbands and Knives]]}} | + | {{TB|"[[Husbands and Knives]]"}} |
{{TBT|Springfield Asylum}} | {{TBT|Springfield Asylum}} | ||
| − | {{TB|[[Paths of Glory]]}} | + | {{TB|"[['Paths of Glory]]"}} |
| − | {{TBT|Dr. Lenny's Lab, Fruit-Bat-Signal}} | + | {{TBT|Dr. Lenny's Lab, Fruit-Bat-Signal,<br>Wholesome & Sons Publishing<br>Satellite Station}} |
| − | {{TB|[[Dark Knight Court]]}} | + | {{TB|"[[Dark Knight Court]]"}} |
{{TBT|Crap Silo}} | {{TBT|Crap Silo}} | ||
| − | {{TB|[[The Simpsons Movie]]}} | + | {{TB|[[The Simpsons Movie]], "[[He Loves to Fly and He D'ohs]]" (opening sequence)}} |
| + | {{TBT|Tar Pits}} | ||
| + | {{TB|"[[Bart Gets an Elephant]]"}} | ||
{{TBT|Burns State Prison}} | {{TBT|Burns State Prison}} | ||
| − | {{TB|[[The Seven-Beer Snitch]]}} | + | {{TB|"[[The Seven-Beer Snitch]]"}} |
{{TBT|National Bank of Springfield}} | {{TBT|National Bank of Springfield}} | ||
| − | {{TB|[[The Lastest Gun in the West]], [[Dark Knight Court]]}} | + | {{TB|"[[The Lastest Gun in the West]]", "[[Dark Knight Court]]"}} |
{{TBT|Botanical Gardens}} | {{TBT|Botanical Gardens}} | ||
| − | {{TB|[[A Fish Called Selma]], [[Moe Baby Blues]]}} | + | {{TB|"[[A Fish Called Selma]]", "[[Moe Baby Blues]]"}} |
{{TBT|Death Mountain}} | {{TBT|Death Mountain}} | ||
| − | {{TB|[[Who Shot Mr. Burns? (Part Two)]] (mentioned)}} | + | {{TB|"[[Who Shot Mr. Burns? (Part Two)]]" (mentioned)}} |
{{TBT|Atomic Bomb}} | {{TBT|Atomic Bomb}} | ||
| − | {{TB|[[Sideshow Bob's Last Gleaming]]}} | + | {{TB|"[[Sideshow Bob's Last Gleaming]]"}} |
{{TBT|Basketball Court}} | {{TBT|Basketball Court}} | ||
| − | {{TB|[[Treehouse of Horror XXII|Treehouse of Horror XXII - "In the | + | {{TB|[[Treehouse of Horror XXII|Treehouse of Horror XXII - "In the Na'vi"]]}} |
| − | {{TBT|High Voltage Transformer | + | {{TBT|Orphan Alley, High Voltage Transformer,<br>Kiosk, Giant Snake in a Tree}} |
| − | {{TB|[[Revenge Is a Dish Best Served Three Times]]}} | + | {{TB|"[[Revenge Is a Dish Best Served Three Times]]"}} |
| + | {{TBT|Lobster Island}} | ||
| + | {{TB|Real life's {{W|Prince Edward Island}}}} | ||
{{TBT|Plastic Prison}} | {{TBT|Plastic Prison}} | ||
| − | {{TB|[[Bart's New Friend]]}} | + | {{TB|"[[Bart's New Friend]]"}} |
| − | {{TBT|Bouncing Battle Baby, | + | {{TBT|Pie Man Epic Statue}} |
| − | {{TB|Comics}} | + | {{TB|"[[Simple Simpson]]" (pose)}} |
| − | {{TBT| | + | {{TBT|Bouncing Battle Baby, Superior Squad HQ,<br>Zenith City Times, Zenith City Apartments,<br>Zenith City Lofts, Zenith City Store Front,<br>Bartman Cave, Kane Manor,<br>Zenith City Phone Booth, Zenith City Condo,<br>Zenith City Penthouse, Zenith City Offices,<br>Zenith City Mailbox, Zenith City Bin,<br>Zenith City Billboard}} |
| + | {{TB|[[List of Comics|Comics]]}} | ||
| + | {{TBT|Sciencewater}} | ||
| + | {{TB|"[[Waverly Hills 9-0-2-1-D'oh]]"}} | ||
| + | {{TBT|Band-Aid}} | ||
| + | {{TB|"[[I, (Annoyed Grunt)-bot]]"}} | ||
| + | {{TBT|Brass Knuckle}} | ||
| + | {{TB|"[[Lisa Goes Gaga]]", "[[Treehouse of Horror XXVII]]" (poster)}} | ||
| + | {{TBT|Canned Crab Juice}} | ||
| + | {{TB|"[[The City of New York vs. Homer Simpson]]"}} | ||
| + | {{TBT|Boss: Pinchy}} | ||
| + | {{TB|"[[Lisa Gets an "A"]]", "[[A Father's Watch]]" (couch gag)}} | ||
| + | {{TBT|Bent Over Lamppost, Green Bin,<br>Hero Clothesline, Beach House,<br>Radstation Air Fortress,<br>Super Jeb, Rad Mobile,<br>Testost-Irene, Doctor Doc M.D PhD,<br>Tungsten Dude, STEAM-antha,<br>Gluteus, Meg Ahertz, Finite Stone}} | ||
{{TB|[[The Simpsons: Tapped Out]] exclusive}} | {{TB|[[The Simpsons: Tapped Out]] exclusive}} | ||
| + | }} | ||
| + | |||
| + | == Gameplay == | ||
| + | {{Table| | ||
| + | {{THT| | ||
| + | <big>'''[[The Simpsons: Tapped Out Superheroes 2 content update/Issue 1 Gameplay|Issue 1 Gameplay]]'''</big><br> | ||
| + | <big>'''[[The Simpsons: Tapped Out Superheroes 2 content update/Issue 2 Gameplay|Issue 2 Gameplay]]'''</big><br> | ||
| + | <big>'''[[The Simpsons: Tapped Out Superheroes 2 content update/Issue 3 and Boss Fight Gameplay|Issue 3 and Boss Fight Gameplay]]'''</big><br> | ||
| + | <big>'''[[The Simpsons: Tapped Out Superheroes 2 content update/Prizes and Craftables Gameplay|Prizes and Craftables Gameplay]]'''</big><br> | ||
| + | <big>'''[[The Simpsons: Tapped Out Superheroes 2 content update/Premium Gameplay|Premium Gameplay]]'''</big>}} | ||
| + | }} | ||
| + | |||
| + | == Daily Challenges == | ||
| + | {{Main|Daily Challenges}} | ||
| + | [[File:SH2 Daily Challenges.png|300px]] | ||
| + | {{Table| | ||
| + | {{TH|Quest}} | ||
| + | {{TH|Possible Reward}} | ||
| + | {{TBT|Win a Felon Battle without Healing [x3]}} | ||
| + | {{TRs|500 Event Currency|2}} | ||
| + | {{TBT|Win a Battle against a Friend [x3]}} | ||
| + | {{TBT|Win a Felon Battle [x6]}} | ||
| + | {{TRs|[[File:SH2 Finite Stone.png|30px]]240|2}} | ||
| + | {{TBT|Upgrade a Fighter [x2]}} | ||
| + | {{TBT|Win a Battle against a Friend without Healing}} | ||
| + | {{TB|[[File:Sciencewater Bottle.png|30px]]6}} | ||
| + | {{TBT|Collect Trading Cards [x20]}} | ||
| + | {{TB|{{TradingC|250}}}} | ||
| + | {{TBT|Play a Felon Battle [x3]}} | ||
| + | {{TRs|500 Event Currency<br>{{TradingC|100}}<br>{{TradingC|250}}<br>[[File:SH2 Finite Stone.png|30px]]120<br>[[File:SH2 Finite Stone.png|30px]]240<br>[[File:Sciencewater Bottle.png|30px]]6<br>{{Donut|1}}<br>{{Donut|3}}|8}} | ||
| + | {{TBT|Win a Felon Battle [x3]}} | ||
| + | {{TBT|Win a Battle against a Friend}} | ||
| + | {{TBT|Heal a Fighter in Battle [x3]}} | ||
| + | {{TBT|Heal a Fighter outside of Battle [x2]}} | ||
| + | {{TBT|Capture Criminals [x20]}} | ||
| + | {{TBT|Craft an Item}} | ||
| + | {{TBT|Send the Sequel Squad to Burns' Summer Mansion [x5]}} | ||
| + | }} | ||
| + | |||
| + | == Prizes == | ||
| + | <gallery> | ||
| + | File:SH2 Act 1 Prizes.png|Issue 1 Prizes | ||
| + | File:SH2 Act 2 Prizes.png|Issue 2 Prizes | ||
| + | File:SH2 Act 3 Prizes.png|Issue 3 Prizes | ||
| + | File:SH2 Social Battle Prizes.png|Social Battle Prizes | ||
| + | </gallery> | ||
| + | === Issue 1 === | ||
| + | {{Table| | ||
| + | {{TH|Image}} | ||
| + | {{TH|Name}} | ||
| + | {{TH|Cost}} | ||
| + | {{TBT|[[File:SH2 Sciencewater Pack.png|100px]]}} | ||
| + | {{TB|Sciencewater Pack: [[File:Sciencewater Bottle.png|30px]]6}} | ||
| + | {{TB|{{BrassK|2850}}}} | ||
| + | {{TBT|[[File:Mylar Baggings.png|100px]]}} | ||
| + | {{TB|Mylar Baggins}} | ||
| + | {{TB|{{BrassK|11500}}}} | ||
| + | {{TBT|[[File:Tapped Out Alien.png|100px]]}} | ||
| + | {{TB|Alien}} | ||
| + | {{TB|{{BrassK|19000}}}} | ||
| + | {{TBT|[[File:First Aid Kit.png|75px]]}} | ||
| + | {{TB|First Aid Kit: {{BandA|20}}}} | ||
| + | {{TB|{{BrassK|23600}}}} | ||
| + | {{TBT|[[File:Cyborg Snake.png|75px]]}} | ||
| + | {{TB|Cyborg Snake}} | ||
| + | {{TB|{{BrassK|33400}}}} | ||
| + | {{TBT|[[File:Tapped Out Aqua World Main Guard Tower.png|75px]]}} | ||
| + | {{TB|Aqua World Main Guard Tower}} | ||
| + | {{TB|{{BrassK|41450}}}} | ||
| + | {{TBT|[[File:Old King Coal.png|75px]]}} | ||
| + | {{TB|Old King Coal}} | ||
| + | {{TB|{{BrassK|52950}}}} | ||
| + | }} | ||
| + | === Issue 2 === | ||
| + | {{Table| | ||
| + | {{TH|Image}} | ||
| + | {{TH|Name}} | ||
| + | {{TH|Cost}} | ||
| + | {{TBT|[[File:First Aid Kit.png|75px]]}} | ||
| + | {{TB|First Aid Kit: {{BandA|20}}}} | ||
| + | {{TB|{{SoilantR|2150}}}} | ||
| + | {{TBT|[[File:Clobber Girl.png|75px]]}} | ||
| + | {{TB|Clobber Girl}} | ||
| + | {{TB|{{SoilantR|12950}}}} | ||
| + | {{TBT|[[File:Tapped Out Attack Helicopter.png|100px]]}} | ||
| + | {{TB|Attack Helicopter}} | ||
| + | {{TB|{{SoilantR|22300}}}} | ||
| + | {{TBT|[[File:SH2 Sciencewater Pack.png|100px]]}} | ||
| + | {{TB|Sciencewater Pack: [[File:Sciencewater Bottle.png|30px]]6}} | ||
| + | {{TB|{{SoilantR|29500}}}} | ||
| + | {{TBT|[[File:Tapped Out X-Ray Machine.png|100px]]}} | ||
| + | {{TB|X-Ray Machine}} | ||
| + | {{TB|{{SoilantR|41000}}}} | ||
| + | {{TBT|[[File:Tapped Out Plastic Prison.png|100px]]}} | ||
| + | {{TB|Plastic Prison}} | ||
| + | {{TB|{{SoilantR|50350}}}} | ||
| + | {{TBT|[[File:Stretch Dude.png|50px]]}} | ||
| + | {{TB|Stretch Dude}} | ||
| + | {{TB|{{SoilantR|64750}}}} | ||
| + | }} | ||
| + | === Issue 3 === | ||
| + | {{Table| | ||
| + | {{TH|Image}} | ||
| + | {{TH|Name}} | ||
| + | {{TH|Cost}} | ||
| + | {{TBT|[[File:First Aid Kit.png|75px]]}} | ||
| + | {{TB|First Aid Kit: {{BandA|20}}}} | ||
| + | {{TB|{{CrabJ|5600}}}} | ||
| + | {{TBT|[[File:Tapped Out X-Ray Truck.png|100px]]}} | ||
| + | {{TB|X-Ray Truck}} | ||
| + | {{TB|{{CrabJ|16850}}}} | ||
| + | {{TBT|[[File:SH2 Sciencewater Pack.png|100px]]}} | ||
| + | {{TB|Sciencewater Pack: [[File:Sciencewater Bottle.png|30px]]6}} | ||
| + | {{TB|{{CrabJ|28100}}}} | ||
| + | {{TBT|[[File:Bouncing Battle Baby.png|75px]]}} | ||
| + | {{TB|Bouncing Battle Baby}} | ||
| + | {{TB|{{CrabJ|45000}}}} | ||
| + | {{TBT|[[File:TSTO Spirography Factory.png|100px]]}} | ||
| + | {{TB|Spirography Factory}} | ||
| + | {{TB|{{CrabJ|61900}}}} | ||
| + | {{TBT|[[File:Dr. Lenny's Lab.png|75px]]}} | ||
| + | {{TB|Dr. Lenny's Lab}} | ||
| + | {{TB|{{CrabJ|78800}}}} | ||
| + | {{TBT|[[File:Dr. Crab.png|75px]]}} | ||
| + | {{TB|Dr. Crab}} | ||
| + | {{TB|{{CrabJ|103600}}}} | ||
| + | }} | ||
| + | |||
| + | === Social Battle === | ||
| + | {{Table| | ||
| + | {{TH|Image}} | ||
| + | {{TH|Name}} | ||
| + | {{TH|Social Battles Done}} | ||
| + | {{TBT|[[File:Tungsten Dude.png|50px]]}} | ||
| + | {{TB|Tungsten Dude}} | ||
| + | {{TB|{{SB|3}}}} | ||
| + | {{TBT|[[File:Sciencewater Cooler.png|75px]]}} | ||
| + | {{TB|Sciencewater Cooler: [[File:Sciencewater Bottle.png|30px]]9}} | ||
| + | {{TB|{{SB|7}}}} | ||
| + | {{TBT|[[File:Tapped Out Kiosk.png|50px]]}} | ||
| + | {{TB|Kiosk}} | ||
| + | {{TB|{{SB|12}}}} | ||
| + | {{TBT|[[File:STEM-antha.png|50px]]}} | ||
| + | {{TB|STEM-antha}} | ||
| + | {{TB|{{SB|19}}}} | ||
| + | {{TBT|[[File:Trading Card Box.png|75px]]}} | ||
| + | {{TB|Trading Card Box: {{TradingC|500}}}} | ||
| + | {{TB|{{SB|25}}}} | ||
| + | {{TBT|[[File:Gluteus.png|50px]]}} | ||
| + | {{TB|Gluteus}} | ||
| + | {{TB|{{SB|34}}}} | ||
| + | {{TBT|[[File:Tapped Out Pie Man Epic Statue.png|50px]]}} | ||
| + | {{TB|Pie Man Epic Statue}} | ||
| + | {{TB|{{SB|44}}}} | ||
| + | {{TBT|[[File:First Aid Kit.png|50px]]}} | ||
| + | {{TB|First Aid Kit: {{BandA|20}}}} | ||
| + | {{TB|{{SB|54}}}} | ||
| + | {{TBT|[[File:Meg Ahertz.png|50px]]}} | ||
| + | {{TB|Meg Ahertz}} | ||
| + | {{TB|{{SB|66}}}} | ||
| + | {{TBT|[[File:One Week Wonder Films.png|100px]]}} | ||
| + | {{TB|One Week Wonder Films}} | ||
| + | {{TB|{{SB|77}}}} | ||
| + | }} | ||
| + | |||
| + | == Crafting == | ||
| + | [[File:SH2 The Collector's Shop.png|300px]] | ||
| + | === Issue 1 === | ||
| + | {{Table| | ||
| + | {{TH|Image}} | ||
| + | {{TH|Name}} | ||
| + | {{TH|Cost}} | ||
| + | {{TBT|[[File:TSTO Springfield Books.png|100px]]}} | ||
| + | {{TB|Springfield Books}} | ||
| + | {{TB|{{TradingC|2410}}}} | ||
| + | {{TBT|[[File:Tapped Out The Collector Lucite Statue.png|75px]]}} | ||
| + | {{TB|The Collector Lucite Statue}} | ||
| + | {{TB|{{TradingC|785}}}} | ||
| + | {{TBT|[[File:Tapped Out Lucite Container.png|100px]]}} | ||
| + | {{TB|Lucite Container}} | ||
| + | {{TB|{{TradingC|325}}}} | ||
| + | {{TBT|[[File:Tapped Out The Collector's Car.png|100px]]}} | ||
| + | {{TB|The Collector's Car}} | ||
| + | {{TB|{{TradingC|965}}}} | ||
| + | }} | ||
| + | === Issue 2 === | ||
| + | {{Table| | ||
| + | {{TH|Image}} | ||
| + | {{TH|Name}} | ||
| + | {{TH|Cost}} | ||
| + | {{TBT|[[File:Tapped Out Zenith City Times.png|25px]]}} | ||
| + | {{TB|Zenith City Times}} | ||
| + | {{TB|{{TradingC|960}}}} | ||
| + | {{TBT|[[File:Zenith City New Items Pack.png|75px]]}} | ||
| + | {{TB|Zenith City Condo, Zenith City Penthouse, Zenith City Offices}} | ||
| + | {{TB|{{TradingC|960}}}} | ||
| + | {{TBT|[[File:Tapped Out Zenith City Billboard.png|75px]]}} | ||
| + | {{TB|Zenith City Billboard}} | ||
| + | {{TB|{{TradingC|335}}}} | ||
| + | {{TBT|[[File:Tapped Out Giant Snake in a Tree.png|50px]]}} | ||
| + | {{TB|Giant Snake in a Tree}} | ||
| + | {{TB|{{TradingC|835}}}} | ||
| + | {{TBT|[[File:Tapped Out Aqua World Wharf.png|50px]]}} | ||
| + | {{TB|Aqua World Wharf}} | ||
| + | {{TB|{{TradingC|2415}}}} | ||
| + | {{THT|Aqua World Wharf is wrongly shown in the menu as the same as the premium Aqua World Fishing Platform.|colspan=3}} | ||
| + | }} | ||
| + | === Issue 3 === | ||
| + | {{Table| | ||
| + | {{TH|Image}} | ||
| + | {{TH|Name}} | ||
| + | {{TH|Cost}} | ||
| + | {{TBT|[[File:Zenith City Returning Pack.png|75px]]}} | ||
| + | {{TB|Zenith City Store Front, Zenith City Apartments, Zenith City Lofts}} | ||
| + | {{TB|{{TradingC|945}}}} | ||
| + | {{TBT|[[File:Tapped Out Botanical Garden.png|100px]]}} | ||
| + | {{TB|Botanical Garden}} | ||
| + | {{TB|{{TradingC|945}}}} | ||
| + | {{TBT|[[File:Tapped Out Atomic Bomb.png|75px]]}} | ||
| + | {{TB|Atomic Bomb}} | ||
| + | {{TRs|{{TradingC|170}}|4}} | ||
| + | {{TBT|[[File:Tapped Out Bent Over Lamppost.png|50px]]}} | ||
| + | {{TB|Bent Over Lamppost}} | ||
| + | {{TBT|[[File:Tapped Out Zenith City Mailbox.png|50px]]}} | ||
| + | {{TB|Zenith City Mailbox}} | ||
| + | {{TBT|[[File:Garbage Cans Pack.png|50px]]}} | ||
| + | {{TB|Garbage Can, Green Bin, Zenith City Bin}} | ||
| + | {{TBT|[[File:Tapped Out Hero Clothesline.png|50px]]}} | ||
| + | {{TB|Hero Clothesline}} | ||
| + | {{TB|{{TradingC|210}}}} | ||
| + | {{TBT|[[File:Tapped Out High Voltage Transformer.png|50px]]}} | ||
| + | {{TB|High Voltage Transformer}} | ||
| + | {{TB|{{TradingC|335}}}} | ||
| + | {{TBT|[[File:Tapped Out Painted Horse.png|50px]]}} | ||
| + | {{TB|Painted Horse}} | ||
| + | {{TB|{{TradingC|790}}}} | ||
| + | }} | ||
| + | === Bastille Day === | ||
| + | {{Table| | ||
| + | {{TH|Image}} | ||
| + | {{TH|Name}} | ||
| + | {{TH|Cost}} | ||
| + | {{TBT|[[File:France Flag and Charcoal Briquette.png|50px]]}} | ||
| + | {{TB|France Flag and Charcoal Briquette}} | ||
| + | {{TB|{{TradingC|4000}}}} | ||
| + | }} | ||
| + | === All Issues === | ||
| + | {{Table| | ||
| + | {{TH|Image}} | ||
| + | {{TH|Name}} | ||
| + | {{TH|Cost}} | ||
| + | {{TBT|[[File:Small Band-Aid Box.png|50px]]}} | ||
| + | {{TB|Small Band-Aid Box: {{BandA|5}}}} | ||
| + | {{TB|{{TradingC|100}} (Issue 1-2) - 105 (Issue 3)}} | ||
| + | {{TBT|[[File:Large Band-Aid Box.png|50px]]}} | ||
| + | {{TB|Large Band-Aid Box: {{BandA|10}}}} | ||
| + | {{TB|{{TradingC|180}}}} | ||
| + | {{TBT|[[File:First Aid Kit.png|50px]]}} | ||
| + | {{TB|First Aid Kit: {{BandA|20}}}} | ||
| + | {{TB|{{TradingC|340}}}} | ||
| + | }} | ||
| + | |||
| + | == Burns' Mansion Upgrades == | ||
| + | [[File:SH2 Burns' Summer Mansion Upgrade.png|300px]] | ||
| + | {{Table| | ||
| + | {{TH|Character}} | ||
| + | {{TH|Job}} | ||
| + | {{TH|Reward}} | ||
| + | {{THT|All jobs are 4 hour long. Each level requires [[File:SH2 Square Inches.png|20px]]6xLevel. Level 5 unlocks the West Wing and 15 unlocks the East Wing. All levels increases the Tap Radius on Felons.|colspan=3}} | ||
| + | {{TBT|Pie Man}} | ||
| + | {{TB|Eat 50 Year Old Snacks}} | ||
| + | {{TRs|[[File:SH2 Square Inches.png|30px]]2 and 6 Event Currency|10}} | ||
| + | {{TBT|Fallout Boy}} | ||
| + | {{TB|Scrub the Floors With a Toothbrush}} | ||
| + | {{TBT|Clownface}} | ||
| + | {{TB|Blow Dust Off Surfaces}} | ||
| + | {{TBT|The Collector}} | ||
| + | {{TB|Duct Tape the Windows}} | ||
| + | {{TBT|Cyborg Snake}} | ||
| + | {{TB|Eliminate Vermin}} | ||
| + | {{TBT|Clobber Girl}} | ||
| + | {{TB|Rearrange Furniture}} | ||
| + | {{TBT|Stretch Dude}} | ||
| + | {{TB|Unclog Drains}} | ||
| + | {{TBT|Bouncing Battle Baby}} | ||
| + | {{TB|Test Flooring Resistance}} | ||
| + | {{TBT|Old King Coal}} | ||
| + | {{TB|Boss People Around}} | ||
| + | {{TBT|Charcoal Briquette}} | ||
| + | {{TB|Burn Incense}} | ||
| + | {{TBT|The Fracker}} | ||
| + | {{TB|Refill Oil Tank}} | ||
| + | {{TRs|[[File:SH2 Square Inches.png|30px]]4 and 12 Event Currency|4}} | ||
| + | {{TBT|The Scout Master}} | ||
| + | {{TB|Apply Feng Shui}} | ||
| + | {{TBT|Citizen Solar}} | ||
| + | {{TB|Install Solar Panels}} | ||
| + | {{TBT|Wind Lad}} | ||
| + | {{TB|Blow Off Spider Webs}} | ||
| + | }} | ||
| + | |||
| + | == Currency Earning Jobs == | ||
| + | {{Table| | ||
| + | {{TH|Item or Event}} | ||
| + | {{TH|Time}} | ||
| + | {{TH|Event Currency Reward}} | ||
| + | {{TBT|Soilant Red Factory}} | ||
| + | {{TB|8h}} | ||
| + | {{TB|9}} | ||
| + | {{TBT|Boss Fight jobs}} | ||
| + | {{TRs|4h|3}} | ||
| + | {{TRs|Freemium: 6<br>Premium: 12|2}} | ||
| + | {{TBT|Burns' Summer Mansion Upgrade jobs}} | ||
| + | {{TBT|Satellite Station}} | ||
| + | {{TB|Issue 1: 170<br>Issue 2: 200<br>Issue 3: 290}} | ||
| + | {{TBT|Battles}} | ||
| + | {{TRs||4}} | ||
| + | {{TB|Win: 350<br>Loss: 55<br>Bonus: 4 per heart damage}} | ||
| + | {{TBT|Social Battles}} | ||
| + | {{TB|Win: 100<br>Loss: 20<br>Bonus: 4 per heart damage}} | ||
| + | {{TBT|First Win of the Day}} | ||
| + | {{TB|Issue 1: 300<br>Issue 2: 400<br>Issue 3: 600}} | ||
| + | {{TBT|Boss Fight}} | ||
| + | {{TB|Pt. 1-5: 4000<br>Pt. 6: 1000}} | ||
| + | }} | ||
| + | |||
| + | == Battles == | ||
| + | <gallery> | ||
| + | File:SH2 Act 1 Event Guide.png|Issue 1 Event Guide | ||
| + | File:SH2 Act 2 Event Guide.png|Issue 2 Event Guide | ||
| + | File:SH2 Act 3 Event Guide.png|Issue 3 Event Guide | ||
| + | File:SH2 Battle Guide.png|Battle Guide | ||
| + | File:SH2 Battle Screen without QB.png|Battle Screen without Quick Battles | ||
| + | File:SH2 Battle Screen.png|Battle Screen with Quick Battles | ||
| + | </gallery> | ||
| + | <gallery> | ||
| + | File:SH2 Battle Results.png|Battle Results | ||
| + | File:SH2 First Win of the Day.png|First Win of the Day | ||
| + | File:SH2 Fighter Management Guide.png|Fighter and Felons Management Guide | ||
| + | File:SH2 Fighter Management.png|Fighter Management | ||
| + | File:SH2 Felon Management.png|Felon Management | ||
| + | File:SH2 Social Battle Guide.png|Social Battle Guide | ||
| + | File:SH2 Social Battle Leaderboards.png|Social Battle Leaderboards | ||
| + | </gallery> | ||
| + | You fight sending your superheroes in and having them battle your enemies. If you win you get more resources, and the more damage you do the more you receive too. You get some even if you lose. On the first win of the day you get additional rewards. | ||
| + | *Win: 350 Event Currency and [[File:SH2 Finite Stone.png|30px]]40 | ||
| + | *Loss: 55 Event Currency and [[File:SH2 Finite Stone.png|30px]]10 | ||
| + | *Bonus: 4 Event Currency per each heart of damage done | ||
| + | *First win of the day extra bonus: | ||
| + | **Issue 1: 300 Event Currency and [[File:SH2 Finite Stone.png|30px]]50, | ||
| + | **Issue 2: 400 Event Currency and [[File:SH2 Finite Stone.png|30px]]75, | ||
| + | **Issue 3: 600 Event Currency and [[File:SH2 Finite Stone.png|30px]]120. | ||
| + | The fighting system, similar to Pokémon, consists in a Rock, Paper and Scissors battle. | ||
| + | Brain wins against Tech, Tech wins against Muscles, Muscles wins agains Brain. | ||
| + | Normal effect (same type characters) will do 1 heart of damage. Supereffective will deal 2 hearts of damage. To change the character on the field, press the switch button, but remember, the enemy will get one attack on you that way. | ||
| + | |||
| + | After the battle your fighters will be hurt and need healing. By crafting Band aid kits you can replenish their hearts outside of battle, to get them ready to rumble once again. If you don't have enough materials, the fighters will regain health in time. | ||
| + | |||
| + | If you need to replenish hearts in battle you can also use the Sciencewater. You can get it by tapping criminals or buy one for 2 donuts when you don't have enough. | ||
| + | |||
| + | To power up your partners you can use the Finite Stones obtained from the battles. | ||
| + | |||
| + | You can power them up to get one more heart every time till the max of 5. | ||
| + | |||
| + | Upgrading once costs [[File:SH2 Finite Stone.png|30px]]245, then [[File:SH2 Finite Stone.png|30px]]380 and finally [[File:SH2 Finite Stone.png|30px]]550. | ||
| + | |||
| + | Social battles are important too: you need to do a lot of fights against your friends to earn all the social prizes! | ||
| + | |||
| + | Defeating them or losing to them doesn't matter for the prize (it still matters the same way as normal battles for rewards though) but it's really important you battle every day! | ||
| + | |||
| + | The final prize requires 115 battles, and every day you can only do 3 battles total against your friends! That means 39 days of battles! To battle your friends click on the top right fist icon. If the friend doesn't have that icon, it means your friend hasn't updated to the event yet. | ||
| + | |||
| + | In social battles you'll use felons themself, you can unlock more by fighting against your friends in the prizes. You can heal them the same way as your own characters. | ||
| + | |||
| + | '''Note: '''DO NOT retreat from from a fight in a friend town, it'll count as one of the fights but won't receive a point for the social prizes. | ||
| + | |||
| + | Felons spawn in your town every 4 hours by tapping the Orphan Alley. The maximum number of groups you can have at the same time is 12. | ||
| + | |||
| + | 3 Social Battles can be fought every 24 hours. The timer starts after the first social battle of the day ends. | ||
| + | |||
| + | You can check your and your friend's results in the Event Leaderboard. The red part means a loss, the blue part means a win. The bigger an area is the more the user has won/lost. | ||
| + | |||
| + | '''Quick Battles:''' On June 30th, Quick Battles were introduced, adding a new button on the battle field on the top right. Clicking it, you can speed up the battle and do nothing. However, there's no heal or switch, it all happens as if you'd tap the bottom right button to fight without any other action. To preserve health and deal more damage, control the team manually. | ||
| + | |||
| + | {{Table| | ||
| + | {{TH|Character}} | ||
| + | {{TH|Type}} | ||
| + | {{TH|Starting Hearts}} | ||
| + | {{THT|Heroes and Villains. Max upgradable life level: [[File:SH2 Heart.png|20px]][[File:SH2 Heart.png|20px]][[File:SH2 Heart.png|20px]][[File:SH2 Heart.png|20px]][[File:SH2 Heart.png|20px]]|colspan=3}} | ||
| + | {{TBT|Radioactive Man}} | ||
| + | {{TRs|[[File:SH2 Muscles.png|30px]]|7}} | ||
| + | {{TRs|[[File:SH2 Heart.png|30px]][[File:SH2 Heart.png|30px]][[File:SH2 Empty Heart.png|30px]][[File:SH2 Empty Heart.png|30px]][[File:SH2 Empty Heart.png|30px]]|4}} | ||
| + | {{TBT|Cyborg Snake}} | ||
| + | {{TBT|Pie Man}} | ||
| + | {{TBT|Bartman}} | ||
| + | {{TBT|The Fracker}} | ||
| + | {{TRs|[[File:SH2 Heart.png|30px]][[File:SH2 Heart.png|30px]][[File:SH2 Heart.png|30px]][[File:SH2 Empty Heart.png|30px]][[File:SH2 Empty Heart.png|30px]]|2}} | ||
| + | {{TBT|Clobber Girl}} | ||
| + | {{TBT|Bouncing Battle Baby}} | ||
| + | {{TB|[[File:SH2 Heart.png|30px]][[File:SH2 Heart.png|30px]][[File:SH2 Heart.png|30px]][[File:SH2 Heart.png|30px]][[File:SH2 Empty Heart.png|30px]]}} | ||
| + | {{TBT|Plopper}} | ||
| + | {{TRs|[[File:SH2 Brain.png|30px]]|8}} | ||
| + | {{TRs|[[File:SH2 Heart.png|30px]][[File:SH2 Heart.png|30px]][[File:SH2 Empty Heart.png|30px]][[File:SH2 Empty Heart.png|30px]][[File:SH2 Empty Heart.png|30px]]|3}} | ||
| + | {{TBT|The Collector}} | ||
| + | {{TBT|Fallout Boy}} | ||
| + | {{TBT|Petroleus Rex}} | ||
| + | {{TRs|[[File:SH2 Heart.png|30px]][[File:SH2 Heart.png|30px]][[File:SH2 Heart.png|30px]][[File:SH2 Empty Heart.png|30px]][[File:SH2 Empty Heart.png|30px]]|4}} | ||
| + | {{TBT|Dr. Colossus}} | ||
| + | {{TBT|Stretch Dude}} | ||
| + | {{TBT|The Collider}} | ||
| + | {{TBT|The Scout Master}} | ||
| + | {{TB|[[File:SH2 Heart.png|30px]][[File:SH2 Heart.png|30px]][[File:SH2 Heart.png|30px]][[File:SH2 Heart.png|30px]][[File:SH2 Empty Heart.png|30px]]}} | ||
| + | {{TBT|Fruit-Bat-Man}} | ||
| + | {{TRs|[[File:SH2 Tech.png|30px]]|7}} | ||
| + | {{TRs|[[File:SH2 Heart.png|30px]][[File:SH2 Heart.png|30px]][[File:SH2 Empty Heart.png|30px]][[File:SH2 Empty Heart.png|30px]][[File:SH2 Empty Heart.png|30px]]|5}} | ||
| + | {{TBT|Citizen Solar}} | ||
| + | {{TBT|Wind Lad}} | ||
| + | {{TBT|Old King Coal}} | ||
| + | {{TBT|Clownface}} | ||
| + | {{TBT|The Collider}} | ||
| + | {{TB|[[File:SH2 Heart.png|30px]][[File:SH2 Heart.png|30px]][[File:SH2 Heart.png|30px]][[File:SH2 Empty Heart.png|30px]][[File:SH2 Empty Heart.png|30px]]}} | ||
| + | {{TBT|Charcoal Briquette}} | ||
| + | {{TB|[[File:SH2 Heart.png|30px]][[File:SH2 Heart.png|30px]][[File:SH2 Heart.png|30px]][[File:SH2 Heart.png|30px]][[File:SH2 Empty Heart.png|30px]]}} | ||
| + | {{THT|Felons. Max life level is fixed.|colspan=3}} | ||
| + | {{TBT|Testost-Irene}} | ||
| + | {{TRs|[[File:SH2 Muscles.png|30px]]|2}} | ||
| + | {{TB|[[File:SH2 Heart.png|30px]][[File:SH2 Heart.png|30px]][[File:SH2 Heart.png|30px]][[File:SH2 Heart.png|30px]][[File:SH2 Empty Heart.png|30px]]}} | ||
| + | {{TBT|Gluteus}} | ||
| + | {{TB|[[File:SH2 Heart.png|30px]][[File:SH2 Heart.png|30px]][[File:SH2 Heart.png|30px]][[File:SH2 Heart.png|30px]][[File:SH2 Heart.png|30px]]}} | ||
| + | {{TBT|Doctor Doc M.D PhD}} | ||
| + | {{TRs|[[File:SH2 Brain.png|30px]]|2}} | ||
| + | {{TB|[[File:SH2 Heart.png|30px]][[File:SH2 Heart.png|30px]][[File:SH2 Heart.png|30px]][[File:SH2 Heart.png|30px]][[File:SH2 Empty Heart.png|30px]]}} | ||
| + | {{TBT|STEM-antha}} | ||
| + | {{TB|[[File:SH2 Heart.png|30px]][[File:SH2 Heart.png|30px]][[File:SH2 Heart.png|30px]][[File:SH2 Heart.png|30px]][[File:SH2 Heart.png|30px]]}} | ||
| + | {{TBT|Tungsten Dude}} | ||
| + | {{TRs|[[File:SH2 Tech.png|30px]]|2}} | ||
| + | {{TB|[[File:SH2 Heart.png|30px]][[File:SH2 Heart.png|30px]][[File:SH2 Heart.png|30px]][[File:SH2 Heart.png|30px]][[File:SH2 Empty Heart.png|30px]]}} | ||
| + | {{TBT|Meg Ahertz}} | ||
| + | {{TB|[[File:SH2 Heart.png|30px]][[File:SH2 Heart.png|30px]][[File:SH2 Heart.png|30px]][[File:SH2 Heart.png|30px]][[File:SH2 Heart.png|30px]]}} | ||
}} | }} | ||
== Conform-O-Meter == | == Conform-O-Meter == | ||
| + | {{Table| | ||
| + | {{TH|BUILDING OR ITEM}} | ||
| + | {{TH|RATING}} | ||
| + | {{TH|POINTS}} | ||
| + | {{TBT|Plastic Prison}} | ||
| + | {{TRs|Obedience|9}} | ||
| + | {{TRs|5|2}} | ||
| + | {{TBT|Pie Man Epic Statue}} | ||
| + | {{TBT|Superior Squad HQ}} | ||
| + | {{TRs|10|6}} | ||
| + | {{TBT|Burns State Prison}} | ||
| + | {{TBT|Bartman Cave}} | ||
| + | {{TBT|Death Mountain}} | ||
| + | {{TBT|Rad Mobile}} | ||
| + | {{TBT|Soilant Red Factory}} | ||
| + | {{TBT|Springfield Asylum}} | ||
| + | {{TB|20}} | ||
| + | {{TBT|Radstation Air Fortress}} | ||
| + | {{TRs|Obedience<br>Bonus XP and $|2}} | ||
| + | {{TB|10<br>5%}} | ||
| + | {{TBT|Satellite Station}} | ||
| + | {{TB|10<br>4%}} | ||
| + | {{TBT|Crap Silo}} | ||
| + | {{TRs|Indolence|11}} | ||
| + | {{TRs|10|19}} | ||
| + | {{TBT|Zenith City Apartments}} | ||
| + | {{TBT|Zenith City Lofts}} | ||
| + | {{TBT|Zenith City Store Front}} | ||
| + | {{TBT|Kane Manor}} | ||
| + | {{TBT|Beach House}} | ||
| + | {{TBT|Burns' Summer Mansion}} | ||
| + | {{TBT|Dr. Lenny's Lab}} | ||
| + | {{TBT|Zenith City Condo}} | ||
| + | {{TBT|Zenith City Penthouse}} | ||
| + | {{TBT|Zenith City Offices}} | ||
| + | {{TBT|Dead Lobster}} | ||
| + | {{TB|Gluttony}} | ||
| + | {{TBT|Tar Pits}} | ||
| + | {{TRs|Consumerism|10}} | ||
| + | {{TBT|National Bank of Springfield}} | ||
| + | {{TBT|Zenith City Times}} | ||
| + | {{TBT|Spirography Factory}} | ||
| + | {{TBT|Springfield Books}} | ||
| + | {{TBT|One Week Wonder Films}} | ||
| + | {{TBT|Mylar Baggins}} | ||
| + | {{TBT|First Bank of Springfield}} | ||
| + | {{TRs|20|3}} | ||
| + | {{TBT|Wholesome and Sons Publishing}} | ||
| + | {{TBT|Coolsville}} | ||
| + | {{TBT|Fruit-Bat-Signal}} | ||
| + | {{TRs|Vanity|25}} | ||
| + | {{TRs|10|2}} | ||
| + | {{TBT|Zenith City Phone Booth}} | ||
| + | {{TBT|Radioactive Man Movie Scene}} | ||
| + | {{TRs|100|22}} | ||
| + | {{TBT|Alien}} | ||
| + | {{TBT|Atomic Bomb}} | ||
| + | {{TBT|Attack Helicopter}} | ||
| + | {{TBT|Bent Over Lamppost}} | ||
| + | {{TBT|The Collector Lucite Statue}} | ||
| + | {{TBT|Garbage Can}} | ||
| + | {{TBT|Green Bin}} | ||
| + | {{TBT|Zenith City Bin}} | ||
| + | {{TBT|Hero Clothesline}} | ||
| + | {{TBT|High Voltage Transformer}} | ||
| + | {{TBT|Kiosk}} | ||
| + | {{TBT|Lucile Container}} | ||
| + | {{TBT|Zenith City Mailbox}} | ||
| + | {{TBT|Painted Horse}} | ||
| + | {{TBT|Radioactive Man Billboard}} | ||
| + | {{TBT|X-Ray Machine}} | ||
| + | {{TBT|X-Ray Truck}} | ||
| + | {{TBT|Giant Snake in a Tree}} | ||
| + | {{TBT|The Collector's Car}} | ||
| + | {{TBT|Aqua World Main Guard Tower}} | ||
| + | {{TBT|Aqua World Wharf}} | ||
| + | {{TBT|Orphan Alley}} | ||
| + | {{TB|200}} | ||
| + | {{TBT|Super Jeb}} | ||
| + | {{TRs|Vanity<br>Bonus $ and XP|7}} | ||
| + | {{TB|10<br>0.6%}} | ||
| + | {{TBT|France Flag}} | ||
| + | {{TB|50<br>0.25%}} | ||
| + | {{TBT|Aqua World Fuel Tank}} | ||
| + | {{TB|200<br>1%}} | ||
| + | {{TBT|Aqua World Fishing Platform}} | ||
| + | {{TRs|200<br>2%|2}} | ||
| + | {{TBT|Milhouse's Trailer}} | ||
| + | {{TBT|Basketball Court}} | ||
| + | {{TRs|200<br>2.5%|2}} | ||
| + | {{TBT|Lobster Island}} | ||
| + | {{TBT|Aqua World Prison Tower}} | ||
| + | {{TB|Vanity<br>Bonus $<br>Bonus XP}} | ||
| + | {{TB|200<br>1%<br>0.75}} | ||
| + | {{TBT|Botanical Garden}} | ||
| + | {{TB|Tree-hugging}} | ||
| + | {{TB|100}} | ||
| + | }} | ||
| − | + | == Dates == | |
| − | ==Dates== | ||
{{Table| | {{Table| | ||
| − | {{TH|Date (All Times | + | {{TH|Date (All Times GMT)}} |
{{TH|Event}} | {{TH|Event}} | ||
| − | {{TBT|6/14-7/26}} | + | {{TBT|6/14 7am-7/26 8am}} |
{{TB|Event}} | {{TB|Event}} | ||
| − | {{TBT|6/14-6/21}} | + | {{TBT|6/14 8am-6/21 8am}} |
| − | {{TB|Wholesome And Sons, National Bank of Springfield, Fruit-Bat-Man}} | + | {{TB|Wholesome And Sons Publishing, National Bank of Springfield, Fruit-Bat-Man}} |
| − | {{TBT|6/14-6/28}} | + | {{TBT|6/14 8am-6/28 8am}} |
| − | {{TB|Issue One, Basketball | + | {{TB|Issue One, Basketball Court}} |
| − | {{TBT|6/14-7/30}} | + | {{TBT|6/14 8am-7/30 8am}} |
{{TB|Rad Mobile, Fruit-Bat-Signal}} | {{TB|Rad Mobile, Fruit-Bat-Signal}} | ||
{{TBT|24 hours after first Friend visit}} | {{TBT|24 hours after first Friend visit}} | ||
{{TB|Sequel Squad Membership}} | {{TB|Sequel Squad Membership}} | ||
| − | {{TBT|6/15-7/30}} | + | {{TBT|6/15 8am-7/30 8am}} |
{{TB|Satellite Station}} | {{TB|Satellite Station}} | ||
| − | {{TBT|6/16-7/30}} | + | {{TBT|6/16 8am-7/30 8am}} |
{{TB|Citizen Solar & Wind Lad}} | {{TB|Citizen Solar & Wind Lad}} | ||
| − | {{TBT|6/20-6/28}} | + | {{TBT|6/20 8am-6/28 8am}} |
| − | {{TB|Tar Pits w/ | + | {{TB|Tar Pits w/Petroleus Rex}} |
| − | {{TBT|6/22-6/29}} | + | {{TBT|6/22 8am-6/29 8am}} |
{{TB|Springfield Asylum}} | {{TB|Springfield Asylum}} | ||
| − | {{TBT|6/25-6/28}} | + | {{TBT|6/25 8am-6/28 8am}} |
{{TB|Issue One Crossover}} | {{TB|Issue One Crossover}} | ||
| − | {{TBT|6/28-7/12}} | + | {{TBT|6/27 8am-7/5 8am (After June 27th Patch)}} |
| − | {{TB|Issue Two}} | + | {{TB|First Bank of Springfield}} |
| − | {{TBT|6/28-7/4}} | + | {{TBT|6/28 8am-7/12 8am}} |
| + | {{TB|Issue Two, Aqua World Fuel Tank, Aqua World Prison Tower, Aqua World Fishing Platform, The Fracker}} | ||
| + | {{TBT|6/28 8am-7/4 8am}} | ||
{{TB|Crap Silo w/Plopper, Burns State Prison}} | {{TB|Crap Silo w/Plopper, Burns State Prison}} | ||
| − | {{TBT|6/28-7/5}} | + | {{TBT|6/28 8am-7/5 8am}} |
| − | {{TB| | + | {{TB|Platinum Scratch-R}} |
| − | {{TBT|6/ | + | {{TBT|6/30 8am-7/26 8am (after June 30th Server Update)}} |
| − | |||
| − | |||
{{TB|Quick Battles}} | {{TB|Quick Battles}} | ||
| − | {{TBT|7/3-7/12}} | + | {{TBT|7/3 8am-7/12 8am}} |
{{TB|The Collider, Super Jeb}} | {{TB|The Collider, Super Jeb}} | ||
| − | {{TBT|7/5-7/16}} | + | {{TBT|7/5 8am-7/16 8am}} |
{{TB|Coolsville w/Milo}} | {{TB|Coolsville w/Milo}} | ||
| − | {{TBT|7/9-7/12}} | + | {{TBT|7/8 8am-7/30 8am}} |
| + | {{TB|Bartman Vs Radioactive Man, Bartman, Bartman Cave, Kane Manor, Radioactive Man}} | ||
| + | {{TBT|7/9 8am-7/12 8am}} | ||
{{TB|Issue Two Crossover}} | {{TB|Issue Two Crossover}} | ||
| − | {{TBT|7/12-7/26}} | + | {{TBT|7/10 8am-7/30 8am}} |
| + | {{TB|Radstation Air Fortress}} | ||
| + | {{TBT|7/12 8am-7/26 8am}} | ||
{{TB|Issue Three}} | {{TB|Issue Three}} | ||
| − | {{TBT|7/12-7/30}} | + | {{TBT|7/12 8am-7/30 8am}} |
| − | {{TB|The Scout Master | + | {{TB|The Scout Master, Zenith City Phone Booth}} |
| − | {{TBT|7/13-7/30}} | + | {{TBT|7/13 10pm-7/30 11pm}} |
| − | {{TB|Bastille Day, Charcoal | + | {{TB|Bastille Day, Charcoal Briquette, France Flag}} |
| − | {{TBT|7/14-7/30}} | + | {{TBT|7/14 8am-7/30 8am}} |
{{TB|Lobster Island}} | {{TB|Lobster Island}} | ||
| − | {{TBT|7/16-7/30}} | + | {{TBT|7/16 8am-7/30 8am}} |
| − | {{TB|Death Mountain w/Dr. Colossus | + | {{TB|Death Mountain, Death Mountain w/Dr. Colossus}} |
| − | {{TBT|7/19-7/26}} | + | {{TBT|7/16 9am-7/30 8am}} |
| + | {{TB|Beach House}} | ||
| + | {{TBT|7/19 8am-7/26 8am}} | ||
{{TB|Boss Fight}} | {{TB|Boss Fight}} | ||
| − | {{TBT|7/20-7/26}} | + | {{TBT|7/20 8am-7/26 8am}} |
| − | {{TB| | + | {{TB|Milhouse's Trailer, Platinum Scratch-R, Radioactive Man Movie Scene}} |
}} | }} | ||
| − | ==Other changes made== | + | |
| − | ===June 8th Update (4.21.1 [Kindle only - Removed])=== | + | == Other changes made == |
| + | === June 8th Update (4.21.1 [Kindle only - Removed]) === | ||
*The app icon and the splash screen were changed to new ones for the event. | *The app icon and the splash screen were changed to new ones for the event. | ||
| − | ===June 14th Update (4.21.1; "4_21_Superheroes2")=== | + | |
| + | === June 14th Update (4.21.1; "4_21_Superheroes2") === | ||
*A new character group has been added, Sequel Squad: Bart, Homer, Lisa, Mr. Burns, Krusty, Comic Book Guy, Snake, Maggie, Radioactive Man, Fallout Boy, Plopper, The Collider, Dr. Colossus, Petroleus Rex, The Fracker, The Scout Master, Citizen Solar, Charcoal Briquette, Wind Lad, Old King Coal and Dr. Crab. | *A new character group has been added, Sequel Squad: Bart, Homer, Lisa, Mr. Burns, Krusty, Comic Book Guy, Snake, Maggie, Radioactive Man, Fallout Boy, Plopper, The Collider, Dr. Colossus, Petroleus Rex, The Fracker, The Scout Master, Citizen Solar, Charcoal Briquette, Wind Lad, Old King Coal and Dr. Crab. | ||
*Sideshow Bob won't spawn while a battle is active. | *Sideshow Bob won't spawn while a battle is active. | ||
| Line 701: | Line 1,319: | ||
*Bart's Treehouse, main Krusty Burger, Android's Dungeon, Cooling Towers, Springfield Penitentiary and main Kwik-E-Mart can't be stored and sold. | *Bart's Treehouse, main Krusty Burger, Android's Dungeon, Cooling Towers, Springfield Penitentiary and main Kwik-E-Mart can't be stored and sold. | ||
*Crook and Ladder's Moe's Tavern burning sound was added. | *Crook and Ladder's Moe's Tavern burning sound was added. | ||
| − | ===June 16th Update ("4_21_Superheroes2_Patch1_PostLaunch")=== | + | *Characters can now be sent to special buildings like Open Air Stage, Town Plaza, etc. and still be sent on other tasks too due to a glitch. |
| − | * | + | |
| + | === June 16th Update ("4_21_Superheroes2_Patch1_PostLaunch") === | ||
| + | *If a user retreats from a fight in a friend town, it'll count as one of the fights but won't receive a point for the social battle prizes. | ||
*Fixed a glitch with social fights not resetting at the right time. | *Fixed a glitch with social fights not resetting at the right time. | ||
*Many dual character jobs' ending and friend button press reload is fixed, speeding them up. | *Many dual character jobs' ending and friend button press reload is fixed, speeding them up. | ||
*A bug in upgrading Private Island was fixed. | *A bug in upgrading Private Island was fixed. | ||
*Petroleus Rex's image in the store has changed to show Tar Pits and the hearts icon. | *Petroleus Rex's image in the store has changed to show Tar Pits and the hearts icon. | ||
| − | *Large Band-Aid Box now costs 180 | + | *Large Band-Aid Box now costs [[File:SH2 Trading Cards.png|20px]]180 instead of [[File:SH2 Trading Cards.png|20px]]210. |
| − | *First Aid Kit now costs 340 | + | *First Aid Kit now costs [[File:SH2 Trading Cards.png|20px]]340 instead of [[File:SH2 Trading Cards.png|20px]]420 or [[File:SH2 Trading Cards.png|20px]]425. |
| + | |||
| + | === June 22nd Update ("4_21_Superheroes2_PlatinumScratchR") === | ||
| + | *In the Bastille Day system message, The Collector's Store, wrongly named, was changed to The Collector's Shop. | ||
| + | *Platinum Scratch-R are set to appear again from 6/28 to 7/5 and from 7/20 to 7/27. | ||
| + | *Space Coyote and Homer's Bite Homer's Leg's tap on the characters was fixed from incorrectly moving to Rex Banner to moving to Space Coyote. | ||
| + | *A bug that got characters stuck in Krustyland was fixed. | ||
| + | *Placing Dirt now requires Slack-Jawed Yokel Pt. 2 to be completed. | ||
| + | *Superheroes 2 One Panel store text was changed from black to white. | ||
| + | *An animation was added to Aqua World Fuel Tank and Plastic Prison. | ||
| + | *Fixed a glitch not rewarding Social Battles on Daily Challenges. | ||
| + | *The tooltip "Upgrade Felons to make them stronger!" was added to the Felon Battles. | ||
| + | *After completing Claw and Order Pt. 7, Criminals now walk like crabs. | ||
| + | *After unlocking Old King Coal he's now placed on Inventory instead of being immediately unlocked. | ||
| + | *Store icon for Tar Pits w/Petroleus Rex is now centered. | ||
| + | |||
| + | === June 27th Update ("4_21_Superheroes2_Patch2_PostLaunch") === | ||
| + | *First Bank of Springfield start time was set to June 27th instead of 28th. | ||
| + | |||
| + | === June 29th Update ("4_21_4thOfJuly2016") === | ||
| + | *Pharmaceuticals reward on Insanity Mode has returned and is now permanent. It requires the user to not have more than [[File:Pharmaceutical.png|20px]]200. | ||
| + | *Superheroes 2 Social Battle Prizes cost was changed: | ||
| + | **Tungsten Dude: from [[File:TSTO Social Prize.png|20px]]10 to [[File:TSTO Social Prize.png|20px]]3 | ||
| + | **Sciencewater Cooler: from [[File:TSTO Social Prize.png|20px]]20 to [[File:TSTO Social Prize.png|20px]]7 | ||
| + | **Kiosk: from [[File:TSTO Social Prize.png|20px]]32 to [[File:TSTO Social Prize.png|20px]]12 | ||
| + | **STEM-antha: from [[File:TSTO Social Prize.png|20px]]45 to [[File:TSTO Social Prize.png|20px]]19 | ||
| + | **Trading Card Box: from [[File:TSTO Social Prize.png|20px]]56 to [[File:TSTO Social Prize.png|20px]]25 | ||
| + | **Gluteus: from [[File:TSTO Social Prize.png|20px]]68 to [[File:TSTO Social Prize.png|20px]]34 | ||
| + | **Pie Man Epic Statue: from [[File:TSTO Social Prize.png|20px]]80 to [[File:TSTO Social Prize.png|20px]]44 | ||
| + | **First Aid Kit: from [[File:TSTO Social Prize.png|20px]]92 to [[File:TSTO Social Prize.png|20px]]54 | ||
| + | **Meg Ahertz: from [[File:TSTO Social Prize.png|20px]]105 to [[File:TSTO Social Prize.png|20px]]66 | ||
| + | **One Week Wonder Films: from [[File:TSTO Social Prize.png|20px]]115 to [[File:TSTO Social Prize.png|20px]]77. | ||
| + | *Fighters' description was changed removing "Felons". | ||
| + | |||
| + | === June 30th Update 1 ("4_21_4thOfJuly_Patch1_Postlaunch" )=== | ||
| + | *Superheroes 2's Lay Low's times was changed from 24 hours to 4 hours. | ||
| + | *Superheroes 2's Train Harder than Ever, Infiltrate the Soilant Red Factory and Check Out Mylar Baggins's times were changed from 8 hours to 4 hours. | ||
| + | *Superheroes 2's Eat Algae, Sabotage the Security System and Protest the Lack of Lasers's times were changed from 12 hours to 4 hours. | ||
| + | *Free rush once the job is almost over for multiple character tasks taking Donuts rushing another character instead of the finishing one was fixed. It affect the following Superheroes 2 jobs: Lay Low, Apply for Jobs, Vote on the Registration Act, Train Harder than Ever, Eat Algae, Sneak Crab Juice Into Food, Sabotage the Squishee Machine, Tamper With All the Food, Sabotage the Security System, Infiltrate the Soilant Red Factory, Binge on Lobster Meat, Protest the Lack of Lasers, Listen Intently and Check Out Mylar Baggins. | ||
| + | *Quick Battles System Message was changed from "Important tip: The quick battle button will fast forward time but won't make strategic decisions along the way." to "Important tip: In a quick battle Fighters will attack each other until one team is defeated, no switches or heals will be used." | ||
| + | *Claw & Order Pt. 4's Make Youngsters Ignore the Curfew now requires only 1 youngster to do the job instead of 5. | ||
| + | |||
| + | === June 30th Update 2 (Server Update) === | ||
| + | *Quick Battles were enabled instead of the previous set start day, July 3rd. | ||
| + | |||
| + | === July 4th Update ("4_21_4thOfJuly_Patch2_PostLaunch") === | ||
| + | *Added a description for Death Mountain and Dr. Colossus combo: "Brain Fighters use their noodles to deal double damage against Tech.". | ||
| + | *Springfield National Park with Teddy Roosevelt offer was changed to end on July 8th at 7am GMT. | ||
| + | *Fixed a bug with the 4th of July and Duff Garden offers not showing up in the store after decling it. | ||
| + | *Completing 4th of July character group now yields the correct amount of $ and XP and is now scrolling. | ||
| + | *Death Mountain was set to be also buyable alone without Dr. Colossus if the user has Dr. Colossus. | ||
| + | *Clownface's jobs Check Krusty Brand Merchandise and Plan a Convoluted Heist don't require Clownface Rises to be started anymore. | ||
| + | *The Collider's job Die and Come Back in the Credits doesn't require The Collider Pt. 4 to be started anymore. | ||
| + | *The Collider's job Pet Mr. Boson doesn't require The Collider Pt. 2 to be started anymore. | ||
| + | *The quest National Bank of Springfield doesn't require Clownface Rises to be started anymore. | ||
| + | *Superheroes 2 and 4th of July 2016 one panel positions were switched. | ||
| + | |||
| + | === July 6th Update (4.21.2 Android) and 7th (4.21.2 iOs and Kindle) Update === | ||
| + | *The glitch where characters that can be sent to special buildings like Open Air Stage, Town Plaza, etc. can be sent on other tasks too was fixed. | ||
| + | |||
| + | === July 7th Update ("4_21_4thOfJuly_Patch3_PostLaunch") === | ||
| + | *Instead of July 12th, Radioactive Man, Kane Manor, Bartman and Bartman Cave returns on July 8th and Radstation Air Fortress returns on July 10th. | ||
| + | *Instead of showing just Radioactive Man icon, the offer that includes Radioactive Man, Kane Manor, Bartman and Bartman Cave in one package now shows the proper offer one. | ||
| + | |||
| + | === July 11th Update (Server Update) === | ||
| + | *Issue 3 Prizes cost were changed: | ||
| + | **Bouncing Battle Baby: from [[File:TSTO Canned Crab Juice.png|20px]]46.150 to [[File:TSTO Canned Crab Juice.png|20px]]45.000. | ||
| + | **Spirography Factory: from [[File:TSTO Canned Crab Juice.png|20px]]60.800 to [[File:TSTO Canned Crab Juice.png|20px]]61.900. | ||
| + | **Dr. Lenny's Lab: from [[File:TSTO Canned Crab Juice.png|20px]]78.850 to [[File:TSTO Canned Crab Juice.png|20px]]78.800. | ||
| + | **Dr. Crab: from [[File:TSTO Canned Crab Juice.png|20px]]101.400 to [[File:TSTO Canned Crab Juice.png|20px]]103.600. | ||
| + | |||
| + | === July 18th Update ("4_21_FilmSetPromo") === | ||
| + | *The unreleased Radioactive Man Movie Scene was set to appear in a Gil Promo on July 20th. | ||
| + | *In Claws Combat Pt. 3, Lisa's emotion changed from curious to confused. | ||
| + | *In Claws Combat Pt. 6, Lisa saying "Wow dad, you're taking responsibility..." was changed to "Wow Dad, you're taking responsibility...". | ||
| + | *The name of Dr. Crab's Factory - Destroyed was changed to Soilant Red Factory Destroyed. | ||
| + | *A description was added to the Death Mountain and Dr. Colossus combo: "Brain Fighters use their noodles to deal double damage against Tech.". | ||
| + | *The Squidport Boardwalk Tiles limit in inventory of 400 was removed, together with the glitched non-working tiles if a user had more than 400 stored. | ||
| + | *A possible glitch in the Coffee Shop in Springfield Heights regarding Louie's job was fixed. | ||
| + | *Limited time timer for items set to end on July 30th at 7am GMT, was set to finish on July 26th at 7am GMT, end of the event. | ||
| + | *Wolfcastle's Mansion can now be bought in Early Access for the duration of the Radioactive Man Movie Scene promo. | ||
| + | *Character icons were added for the Boss Fight. | ||
| + | *Sequel Squad Membership cost was changed from {{Donut|90}} to {{Donut|30}}. | ||
| + | *Botanical Garden can't be crafted if not placed anymore, fixing the possibility of crafting it if in inventory. | ||
| + | *Platinum Scratch-R second chance now ends on July 26th instead of July 27th. | ||
| + | *Stretch Dude's job Hop Around with Clobber Girl was removed, probably till fixed. | ||
| + | *If the boss is tapped now the screen shakes. | ||
| + | *Soilant Red Factory getting to the final stage is set once the quest The Dead Lobster is started instead of when it's finished. | ||
| + | *Pie Man's job Deal the Final Blow was changed from 4 hours to 8 hours. | ||
| + | *The questline Hector Von Colossus doesn't require last year's quest anymore, instead it requires Dr. Colossus to be unlocked, unlocking his stuck jobs. | ||
| + | *A 12 hours premium job for Milhouse at Milhouse's Trailer, Sulk About Fame, was added. | ||
| + | |||
| + | === July 19th Update ("4_21_FilmSetPromo_Patch1_PostLaunch") === | ||
| + | *Dead Lobster now requires the building to not have been placed or in inventory too instead of just requiring the quest The Dead Lobster to be started. | ||
| + | *Fixed a glitched animation of Bouncing Battle Baby switching with Homer in battle, but she disappears once fighting the Boss Fight. | ||
| + | |||
| + | == Trailer == | ||
| + | <youtube>https://www.youtube.com/watch?v=rS3kEoT_95A</youtube> | ||
== Sources == | == Sources == | ||
*{{TOUI|Overview_en.htm|Overview}} | *{{TOUI|Overview_en.htm|Overview}} | ||
| − | * | + | *[[File:TOUk Favicon.png]] [http://blogs.tapped-out.co.uk/superheroes-2-event-items Superheroes 2 Event Items] at '''[http://blogs.tapped-out.co.uk/ TOUk Blog]''' |
| − | |||
| − | |||
| − | |||
| − | |||
| − | |||
| − | |||
| − | |||
| − | |||
| − | |||
| − | |||
| − | |||
| − | |||
| − | |||
| − | |||
| − | |||
| − | + | {{Tapped Out}} | |
| − | + | {{Tapped Out updates|2016=yes}} | |
| − | + | {{DEFAULTSORT:Superheroes 2}} | |
| − | |||
| − | |||
Revision as of 13:50, April 27, 2024
|
|
|


- "The duels are done and even the ghosts have left this ghost town. With everyone settling back to normal, what could be next for Springfield? A suped-up sequel? A new take on an origin story? An ominously foreshadowing political thriller? We're not sure yet because Gary accidentally took his work computer on vacation. Not cool Gary!
New characters, new buildings and new stories are coming soon!
Stay tuned!" - ―Event teaser on the App Store.
- "Western duels ended and even ghosts have left town. Life seems to take its course in Springfield. For real ? No ! Because Superhero is back with a scenario to taste away! And political shenanigans to no end. Finally, if Gary does not forget to save the new update. Hey Gary?
One thing is certain : new characters, buildings and adventures await you soon!
Until then , keep playing!!" - ―French Event teaser on the App Store.
- "Superheroes never die, they just wait til their reboot. Coming soon to an app store near you: the Superhero sequel you didn't know you wanted but will still wait through the credits to see!"
- ―Event teaser on the Facebook page.
- "Heroes return to Springfield to fight evil (while gyros return to Springfield to fight a lack of tzatziki sauce). But when a plot is revealed that threatens the entire town, heroes and villains are forced to team up to save it!
Join iconic Simpsons characters and their alter-egos as they battle against a greater evil. With new characters, buildings, decorations, and more... including a new battle system. Can you unite villains and heroes to save the town!?" - ―Event Description on the Kindle Pre-release.
- "Heroes return to Springfield – no not the sandwiches, the crime fighters – to fight a growing tide of criminals! But when someone's evil plot threatens the entire town, old enemies will need to join together to save Springfield!
Join iconic Simpsons characters and their alter-egos as they fight together against a greater evil. With new characters, buildings, decorations, and more... including a new battle system. Can you unite villains and heroes to save the town!?" - ―Event Description on the App Store.
The Simpsons: Tapped Out Superheroes 2 content update was released on June 14, 2016 and was the one hundred and twentyninth content update. It was teased in the Wild West event Takedown app store update and on the game's Facebook page June 11, 2016. Its Store update was released by mistake on Kindle on June 8. Its the second Superheroes event after 2015's. It added 8 new characters, 4 new character skins, 16 new buildings and 36 new decorations.
Contents
- 1 Characters
- 2 Costumes
- 3 Felons (for Social Battles only)
- 4 Buildings
- 5 Combos
- 6 Decorations
- 7 Consumables
- 8 Item origins
- 9 Gameplay
- 10 Daily Challenges
- 11 Prizes
- 12 Crafting
- 13 Burns' Mansion Upgrades
- 14 Currency Earning Jobs
- 15 Battles
- 16 Conform-O-Meter
- 17 Dates
- 18 Other changes made
- 18.1 June 8th Update (4.21.1 [Kindle only - Removed])
- 18.2 June 14th Update (4.21.1; "4_21_Superheroes2")
- 18.3 June 16th Update ("4_21_Superheroes2_Patch1_PostLaunch")
- 18.4 June 22nd Update ("4_21_Superheroes2_PlatinumScratchR")
- 18.5 June 27th Update ("4_21_Superheroes2_Patch2_PostLaunch")
- 18.6 June 29th Update ("4_21_4thOfJuly2016")
- 18.7 June 30th Update 1 ("4_21_4thOfJuly_Patch1_Postlaunch" )
- 18.8 June 30th Update 2 (Server Update)
- 18.9 July 4th Update ("4_21_4thOfJuly_Patch2_PostLaunch")
- 18.10 July 6th Update (4.21.2 Android) and 7th (4.21.2 iOs and Kindle) Update
- 18.11 July 7th Update ("4_21_4thOfJuly_Patch3_PostLaunch")
- 18.12 July 11th Update (Server Update)
- 18.13 July 18th Update ("4_21_FilmSetPromo")
- 18.14 July 19th Update ("4_21_FilmSetPromo_Patch1_PostLaunch")
- 19 Trailer
- 20 Sources
Characters
|


Returning
|


Costumes
|


Returning
|


Felons (for Social Battles only)
|


Buildings
|


Building Upgrades
|


Returning
|


Combos
|


Decorations
|


Returning
|


Consumables
|


Item origins
|
Gameplay
|
Daily Challenges

|
Prizes
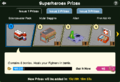
Issue 1 Prizes
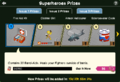
Issue 2 Prizes
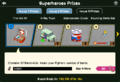
Issue 3 Prizes
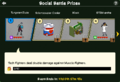
Social Battle Prizes


Issue 1
|

Issue 2
|
Issue 3
|
Social Battle
|


Crafting

Issue 1
|
Issue 2
| |||||||||||||||||||||

Issue 3
|

Bastille Day
|

All Issues
|
Burns' Mansion Upgrades

| ||||||||||||||||||||||||||||||||||||
Currency Earning Jobs
|
Battles
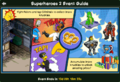
Issue 1 Event Guide
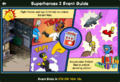
Issue 2 Event Guide
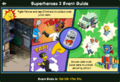
Issue 3 Event Guide
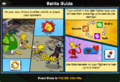
Battle Guide
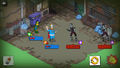
Battle Screen without Quick Battles
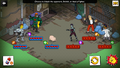
Battle Screen with Quick Battles


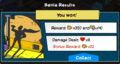
Battle Results
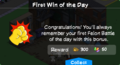
First Win of the Day
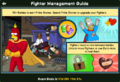
Fighter and Felons Management Guide
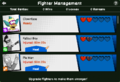
Fighter Management
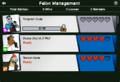
Felon Management
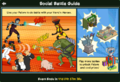
Social Battle Guide
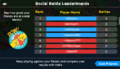
Social Battle Leaderboards


You fight sending your superheroes in and having them battle your enemies. If you win you get more resources, and the more damage you do the more you receive too. You get some even if you lose. On the first win of the day you get additional rewards.
- Win: 350 Event Currency and
 40
40 - Loss: 55 Event Currency and 10
- Bonus: 4 Event Currency per each heart of damage done
- First win of the day extra bonus:
- Issue 1: 300 Event Currency and 50,
- Issue 2: 400 Event Currency and 75,
- Issue 3: 600 Event Currency and 120.
- Issue 1: 300 Event Currency and
The fighting system, similar to Pokémon, consists in a Rock, Paper and Scissors battle. Brain wins against Tech, Tech wins against Muscles, Muscles wins agains Brain. Normal effect (same type characters) will do 1 heart of damage. Supereffective will deal 2 hearts of damage. To change the character on the field, press the switch button, but remember, the enemy will get one attack on you that way.
After the battle your fighters will be hurt and need healing. By crafting Band aid kits you can replenish their hearts outside of battle, to get them ready to rumble once again. If you don't have enough materials, the fighters will regain health in time.
If you need to replenish hearts in battle you can also use the Sciencewater. You can get it by tapping criminals or buy one for 2 donuts when you don't have enough.
To power up your partners you can use the Finite Stones obtained from the battles.
You can power them up to get one more heart every time till the max of 5.
Upgrading once costs ![]() 245, then
245, then ![]() 380 and finally
380 and finally ![]() 550.
550.
Social battles are important too: you need to do a lot of fights against your friends to earn all the social prizes!
Defeating them or losing to them doesn't matter for the prize (it still matters the same way as normal battles for rewards though) but it's really important you battle every day!
The final prize requires 115 battles, and every day you can only do 3 battles total against your friends! That means 39 days of battles! To battle your friends click on the top right fist icon. If the friend doesn't have that icon, it means your friend hasn't updated to the event yet.
In social battles you'll use felons themself, you can unlock more by fighting against your friends in the prizes. You can heal them the same way as your own characters.
Note: DO NOT retreat from from a fight in a friend town, it'll count as one of the fights but won't receive a point for the social prizes.
Felons spawn in your town every 4 hours by tapping the Orphan Alley. The maximum number of groups you can have at the same time is 12.
3 Social Battles can be fought every 24 hours. The timer starts after the first social battle of the day ends.
You can check your and your friend's results in the Event Leaderboard. The red part means a loss, the blue part means a win. The bigger an area is the more the user has won/lost.
Quick Battles: On June 30th, Quick Battles were introduced, adding a new button on the battle field on the top right. Clicking it, you can speed up the battle and do nothing. However, there's no heal or switch, it all happens as if you'd tap the bottom right button to fight without any other action. To preserve health and deal more damage, control the team manually.
| ||||||||||||||||||||||||||||||||||||||||||||||||||||||||||
Conform-O-Meter
|
Dates
|
Other changes made
June 8th Update (4.21.1 [Kindle only - Removed])
- The app icon and the splash screen were changed to new ones for the event.
June 14th Update (4.21.1; "4_21_Superheroes2")
- A new character group has been added, Sequel Squad: Bart, Homer, Lisa, Mr. Burns, Krusty, Comic Book Guy, Snake, Maggie, Radioactive Man, Fallout Boy, Plopper, The Collider, Dr. Colossus, Petroleus Rex, The Fracker, The Scout Master, Citizen Solar, Charcoal Briquette, Wind Lad, Old King Coal and Dr. Crab.
- Sideshow Bob won't spawn while a battle is active.
- The app icon, splash screen, friend visit icon, task book and ambience music were changed to new ones for the event.
- Event Leaderboard was added.
- Nature items, text boxes and text were changed to their comic looks.
- Daily Challenges were added for the event.
- Homer's Drink Beer with Intensity and Recruit an Elite Chili Team jobs now requires Homer's Chiliad event to be active.
- A new row of land was added.
- Completing The End of the Beginning Pt. 22 no longer shows Winter 2015's Act 3 Completed message.
- Building Kane Manor now takes 6 seconds instead of 8 hours and yields
 55 instead of 10 and its task is now premium.
 - Radioactive Man, Dr. Colossus and The Collider's jobs are now premium.
- Building Burns State Prison now takes 6 seconds instead of 8 hours and yields 90 instead of 10 and its task is now premium.
- Building National Bank of Springfield now takes 6 seconds instead of 8 hours and yields 80 instead of 10 and its task is now premium.
- Building Death Mountain now takes 6 seconds instead of 8 hours and yields 120 instead of 10 and its task is now premium.
- Zenith City Store Front was changed from the group Homes to Shops.
- Crap Silo's task is now premium.
- Building Tar Pits now yields 80 instead of 10 and its task is now premium.
- Petroleus Rex's job Terrorize Springfield now requires A Stalk to Remember Pt. 2 or Jurassic Spark Pt. 2 to be started.
- Petroleus Rex's job Do Research now requires A Stalk to Remember Pt. 3 or Jurassic Spark Pt. 3 to be started.
- Petroleus Rex was moved from Super Villains character group to the Fossil Fuel Four character group.
- Re-entering the inventory puts you back at where you left off rather than starting you back at the beginning.
- Placing Zenith City Phone Booth now yields 5,000.
- Placing Super Jeb now yields 25, yields a bonus of 0.6% and 200 Vanity points instead of 50.
- Placing Radstation Air Fortress now yields 225 instead of 250.
- Placing Rad Mobile now yields 10,000 and 50 Vanity points instead of 10 Obedience points.
- The town center was changed to Orphan Alley.
- Bart's Treehouse, main Krusty Burger, Android's Dungeon, Cooling Towers, Springfield Penitentiary and main Kwik-E-Mart can't be stored and sold.
- Crook and Ladder's Moe's Tavern burning sound was added.
- Characters can now be sent to special buildings like Open Air Stage, Town Plaza, etc. and still be sent on other tasks too due to a glitch.
June 16th Update ("4_21_Superheroes2_Patch1_PostLaunch")
- If a user retreats from a fight in a friend town, it'll count as one of the fights but won't receive a point for the social battle prizes.
- Fixed a glitch with social fights not resetting at the right time.
- Many dual character jobs' ending and friend button press reload is fixed, speeding them up.
- A bug in upgrading Private Island was fixed.
- Petroleus Rex's image in the store has changed to show Tar Pits and the hearts icon.
- Large Band-Aid Box now costs
 180 instead of 210.
 - First Aid Kit now costs 340 instead of 420 or 425.
June 22nd Update ("4_21_Superheroes2_PlatinumScratchR")
- In the Bastille Day system message, The Collector's Store, wrongly named, was changed to The Collector's Shop.
- Platinum Scratch-R are set to appear again from 6/28 to 7/5 and from 7/20 to 7/27.
- Space Coyote and Homer's Bite Homer's Leg's tap on the characters was fixed from incorrectly moving to Rex Banner to moving to Space Coyote.
- A bug that got characters stuck in Krustyland was fixed.
- Placing Dirt now requires Slack-Jawed Yokel Pt. 2 to be completed.
- Superheroes 2 One Panel store text was changed from black to white.
- An animation was added to Aqua World Fuel Tank and Plastic Prison.
- Fixed a glitch not rewarding Social Battles on Daily Challenges.
- The tooltip "Upgrade Felons to make them stronger!" was added to the Felon Battles.
- After completing Claw and Order Pt. 7, Criminals now walk like crabs.
- After unlocking Old King Coal he's now placed on Inventory instead of being immediately unlocked.
- Store icon for Tar Pits w/Petroleus Rex is now centered.
June 27th Update ("4_21_Superheroes2_Patch2_PostLaunch")
- First Bank of Springfield start time was set to June 27th instead of 28th.
June 29th Update ("4_21_4thOfJuly2016")
- Pharmaceuticals reward on Insanity Mode has returned and is now permanent. It requires the user to not have more than
 200.
200. - Superheroes 2 Social Battle Prizes cost was changed:
- Tungsten Dude: from
 10 to 3
 - Sciencewater Cooler: from 20 to 7
- Kiosk: from 32 to 12
- STEM-antha: from 45 to 19
- Trading Card Box: from 56 to 25
- Gluteus: from 68 to 34
- Pie Man Epic Statue: from 80 to 44
- First Aid Kit: from 92 to 54
- Meg Ahertz: from 105 to 66
- One Week Wonder Films: from 115 to 77.
- Tungsten Dude: from
- Fighters' description was changed removing "Felons".
June 30th Update 1 ("4_21_4thOfJuly_Patch1_Postlaunch" )
- Superheroes 2's Lay Low's times was changed from 24 hours to 4 hours.
- Superheroes 2's Train Harder than Ever, Infiltrate the Soilant Red Factory and Check Out Mylar Baggins's times were changed from 8 hours to 4 hours.
- Superheroes 2's Eat Algae, Sabotage the Security System and Protest the Lack of Lasers's times were changed from 12 hours to 4 hours.
- Free rush once the job is almost over for multiple character tasks taking Donuts rushing another character instead of the finishing one was fixed. It affect the following Superheroes 2 jobs: Lay Low, Apply for Jobs, Vote on the Registration Act, Train Harder than Ever, Eat Algae, Sneak Crab Juice Into Food, Sabotage the Squishee Machine, Tamper With All the Food, Sabotage the Security System, Infiltrate the Soilant Red Factory, Binge on Lobster Meat, Protest the Lack of Lasers, Listen Intently and Check Out Mylar Baggins.
- Quick Battles System Message was changed from "Important tip: The quick battle button will fast forward time but won't make strategic decisions along the way." to "Important tip: In a quick battle Fighters will attack each other until one team is defeated, no switches or heals will be used."
- Claw & Order Pt. 4's Make Youngsters Ignore the Curfew now requires only 1 youngster to do the job instead of 5.
June 30th Update 2 (Server Update)
- Quick Battles were enabled instead of the previous set start day, July 3rd.
July 4th Update ("4_21_4thOfJuly_Patch2_PostLaunch")
- Added a description for Death Mountain and Dr. Colossus combo: "Brain Fighters use their noodles to deal double damage against Tech.".
- Springfield National Park with Teddy Roosevelt offer was changed to end on July 8th at 7am GMT.
- Fixed a bug with the 4th of July and Duff Garden offers not showing up in the store after decling it.
- Completing 4th of July character group now yields the correct amount of $ and XP and is now scrolling.
- Death Mountain was set to be also buyable alone without Dr. Colossus if the user has Dr. Colossus.
- Clownface's jobs Check Krusty Brand Merchandise and Plan a Convoluted Heist don't require Clownface Rises to be started anymore.
- The Collider's job Die and Come Back in the Credits doesn't require The Collider Pt. 4 to be started anymore.
- The Collider's job Pet Mr. Boson doesn't require The Collider Pt. 2 to be started anymore.
- The quest National Bank of Springfield doesn't require Clownface Rises to be started anymore.
- Superheroes 2 and 4th of July 2016 one panel positions were switched.
July 6th Update (4.21.2 Android) and 7th (4.21.2 iOs and Kindle) Update
- The glitch where characters that can be sent to special buildings like Open Air Stage, Town Plaza, etc. can be sent on other tasks too was fixed.
July 7th Update ("4_21_4thOfJuly_Patch3_PostLaunch")
- Instead of July 12th, Radioactive Man, Kane Manor, Bartman and Bartman Cave returns on July 8th and Radstation Air Fortress returns on July 10th.
- Instead of showing just Radioactive Man icon, the offer that includes Radioactive Man, Kane Manor, Bartman and Bartman Cave in one package now shows the proper offer one.
July 11th Update (Server Update)
- Issue 3 Prizes cost were changed:
- Bouncing Battle Baby: from
 46.150 to 45.000.
 - Spirography Factory: from 60.800 to 61.900.
- Dr. Lenny's Lab: from 78.850 to 78.800.
- Dr. Crab: from 101.400 to 103.600.
- Bouncing Battle Baby: from
July 18th Update ("4_21_FilmSetPromo")
- The unreleased Radioactive Man Movie Scene was set to appear in a Gil Promo on July 20th.
- In Claws Combat Pt. 3, Lisa's emotion changed from curious to confused.
- In Claws Combat Pt. 6, Lisa saying "Wow dad, you're taking responsibility..." was changed to "Wow Dad, you're taking responsibility...".
- The name of Dr. Crab's Factory - Destroyed was changed to Soilant Red Factory Destroyed.
- A description was added to the Death Mountain and Dr. Colossus combo: "Brain Fighters use their noodles to deal double damage against Tech.".
- The Squidport Boardwalk Tiles limit in inventory of 400 was removed, together with the glitched non-working tiles if a user had more than 400 stored.
- A possible glitch in the Coffee Shop in Springfield Heights regarding Louie's job was fixed.
- Limited time timer for items set to end on July 30th at 7am GMT, was set to finish on July 26th at 7am GMT, end of the event.
- Wolfcastle's Mansion can now be bought in Early Access for the duration of the Radioactive Man Movie Scene promo.
- Character icons were added for the Boss Fight.
- Sequel Squad Membership cost was changed from
 90 to 30.
 - Botanical Garden can't be crafted if not placed anymore, fixing the possibility of crafting it if in inventory.
- Platinum Scratch-R second chance now ends on July 26th instead of July 27th.
- Stretch Dude's job Hop Around with Clobber Girl was removed, probably till fixed.
- If the boss is tapped now the screen shakes.
- Soilant Red Factory getting to the final stage is set once the quest The Dead Lobster is started instead of when it's finished.
- Pie Man's job Deal the Final Blow was changed from 4 hours to 8 hours.
- The questline Hector Von Colossus doesn't require last year's quest anymore, instead it requires Dr. Colossus to be unlocked, unlocking his stuck jobs.
- A 12 hours premium job for Milhouse at Milhouse's Trailer, Sulk About Fame, was added.
July 19th Update ("4_21_FilmSetPromo_Patch1_PostLaunch")
- Dead Lobster now requires the building to not have been placed or in inventory too instead of just requiring the quest The Dead Lobster to be started.
- Fixed a glitched animation of Bouncing Battle Baby switching with Homer in battle, but she disappears once fighting the Boss Fight.
Trailer
Sources
 Overview at Tapped Out - Update Information
- File:TOUk Favicon.png Superheroes 2 Event Items at TOUk Blog
The Simpsons: Tapped Out content updates
| ||||||||||||||||||||||||||||||||||||||||||||||||||||||||||||||||||||||||||||||
|---|---|---|---|---|---|---|---|---|---|---|---|---|---|---|---|---|---|---|---|---|---|---|---|---|---|---|---|---|---|---|---|---|---|---|---|---|---|---|---|---|---|---|---|---|---|---|---|---|---|---|---|---|---|---|---|---|---|---|---|---|---|---|---|---|---|---|---|---|---|---|---|---|---|---|---|---|---|---|
| ||||||||||||||||||||||||||||||||||||||||||||||||||||||||||||||||||||||||||||||