Difference between revisions of "The Digital Painting Process"
(→Stage Three) |
|||
| Line 10: | Line 10: | ||
== Stage Three == | == Stage Three == | ||
| − | The colors are picked and rendered. In the ''Milhouse'' pin-up, note the multiple levels of rich shading added to the moons. Also, the red-hot highlight on the edge of the cliff helps tie in the fiery backdrop.<ref>[http://www.bongocomics.com/blog/05/03/2012/digital-painting-process-stage-three Bongo Blog - The Digital Painting Process - Stage Three]</ref> | + | The colors are picked and rendered. In the ''Milhouse #1'' pin-up, note the multiple levels of rich shading added to the moons. Also, the red-hot highlight on the edge of the cliff helps tie in the fiery backdrop.<ref>[http://www.bongocomics.com/blog/05/03/2012/digital-painting-process-stage-three Bongo Blog - The Digital Painting Process - Stage Three]</ref> |
== Stage Four == | == Stage Four == | ||
Revision as of 09:19, May 13, 2012

|
This article is an orphan, as few or no articles link to it. Please introduce links to here from related articles. (May 2012) |
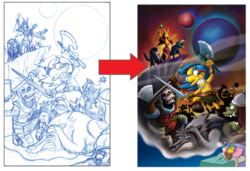
The Digital Painting Process is a process several Simpsons Comics posters go through, from the set up to the finished product. This follows the Evolution of an Illustration, which is where the product is drawn as pencil art. A walkthrough of this process was released on the Bongo Blog in April and May 2012 for a pin-up released with Bart Simpson's Pal, Milhouse #1.
Contents
Stage One
The pencil art is scanned into a computer, and a file with multiple layers is created, so that one part of the image could be painted without the other parts being affected. There is a layer for each element of the pin-up, with each having a temporary color to distinguish it from the others. This allows to separate the line art on to its own layer, so that none of it would be lost in the coloring process.[1]
Stage Two
The background color(s) are chosen, in the Milhouse #1 case, a fiery palete. In the foreground, the placement of light and shadow begins to establish. In the example (seen in the gallery below), the Ogre in the lower right would have the front of his body hit by light, and the back of his body would be in shadow. The hordes of monsters in the background would remain completely silhouetted.[2]
Stage Three
The colors are picked and rendered. In the Milhouse #1 pin-up, note the multiple levels of rich shading added to the moons. Also, the red-hot highlight on the edge of the cliff helps tie in the fiery backdrop.[3]
Stage Four
The rendering is nearly completed, and stage four depicts the colors with the line art layer turned off.[4]
Stage Five
Line work is put down to accentuate the details, and more depth can be added to the piece (e.g. foggy mist), which can accentuate the mood of the colors.[5]
Stage Six
Final details are added (e.g. Milhouse in bed with Puppy Goo-Goo, and the juxtaposition of the two styles helps contrast Milhouse's fantasy life from his real life.) Finally, the Matt Groening signature is added and the product is completed.[6]
Gallery
References
- ↑ Bongo Blog - The Digital Painting Process - Stage One
- ↑ Bongo Blog - The Digital Painting Process - Stage Two
- ↑ Bongo Blog - The Digital Painting Process - Stage Three
- ↑ Bongo Blog - The Digital Painting Process - Stage Four
- ↑ Bongo Blog - The Digital Painting Process - Stage Five
- ↑ Bongo Blog - The Digital Painting Process - Stage Six


